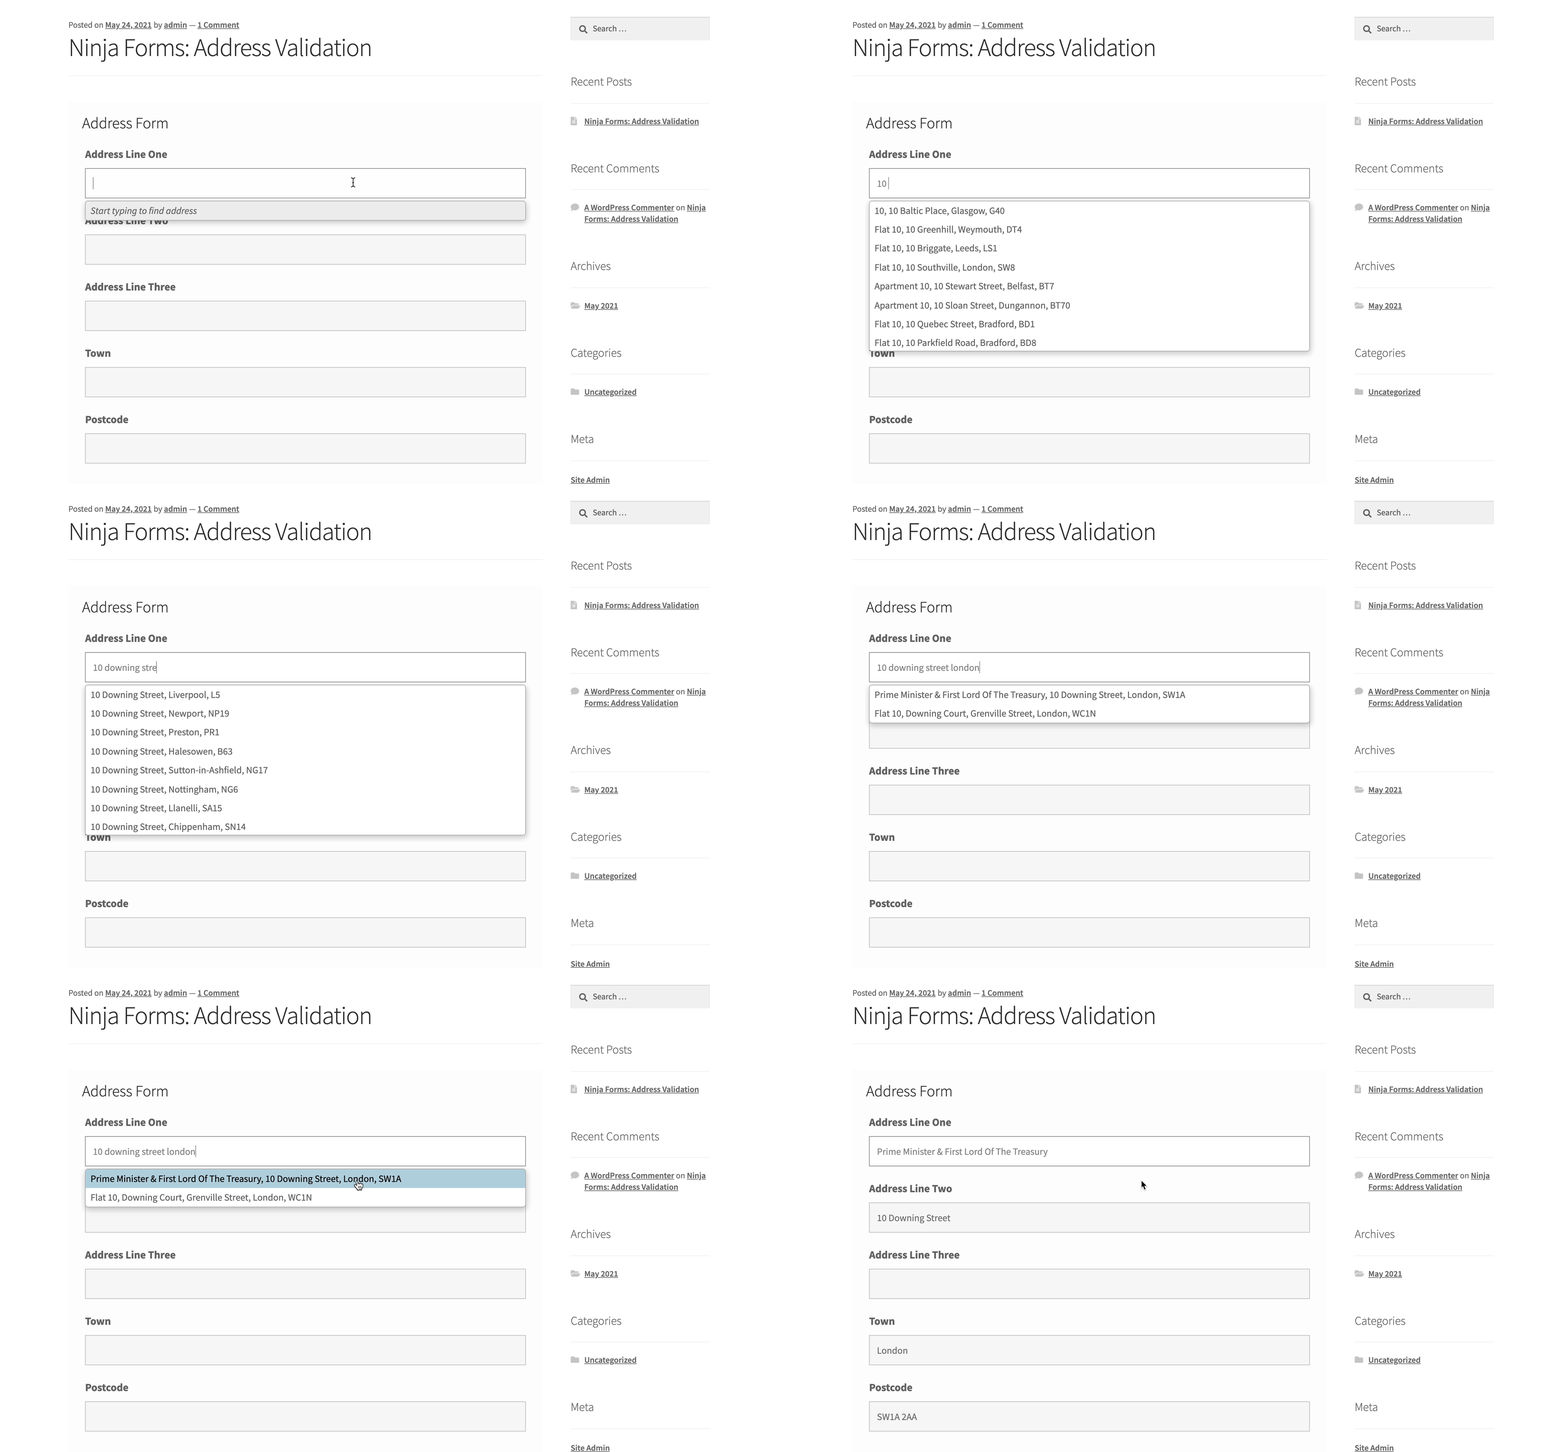
Add address autocompletion and postcode lookup to your Ninja Forms pages.
Installation
This integration works by adding our Address Validation tools using WordPress' form editor. Below are the instructions to add Address Finder.
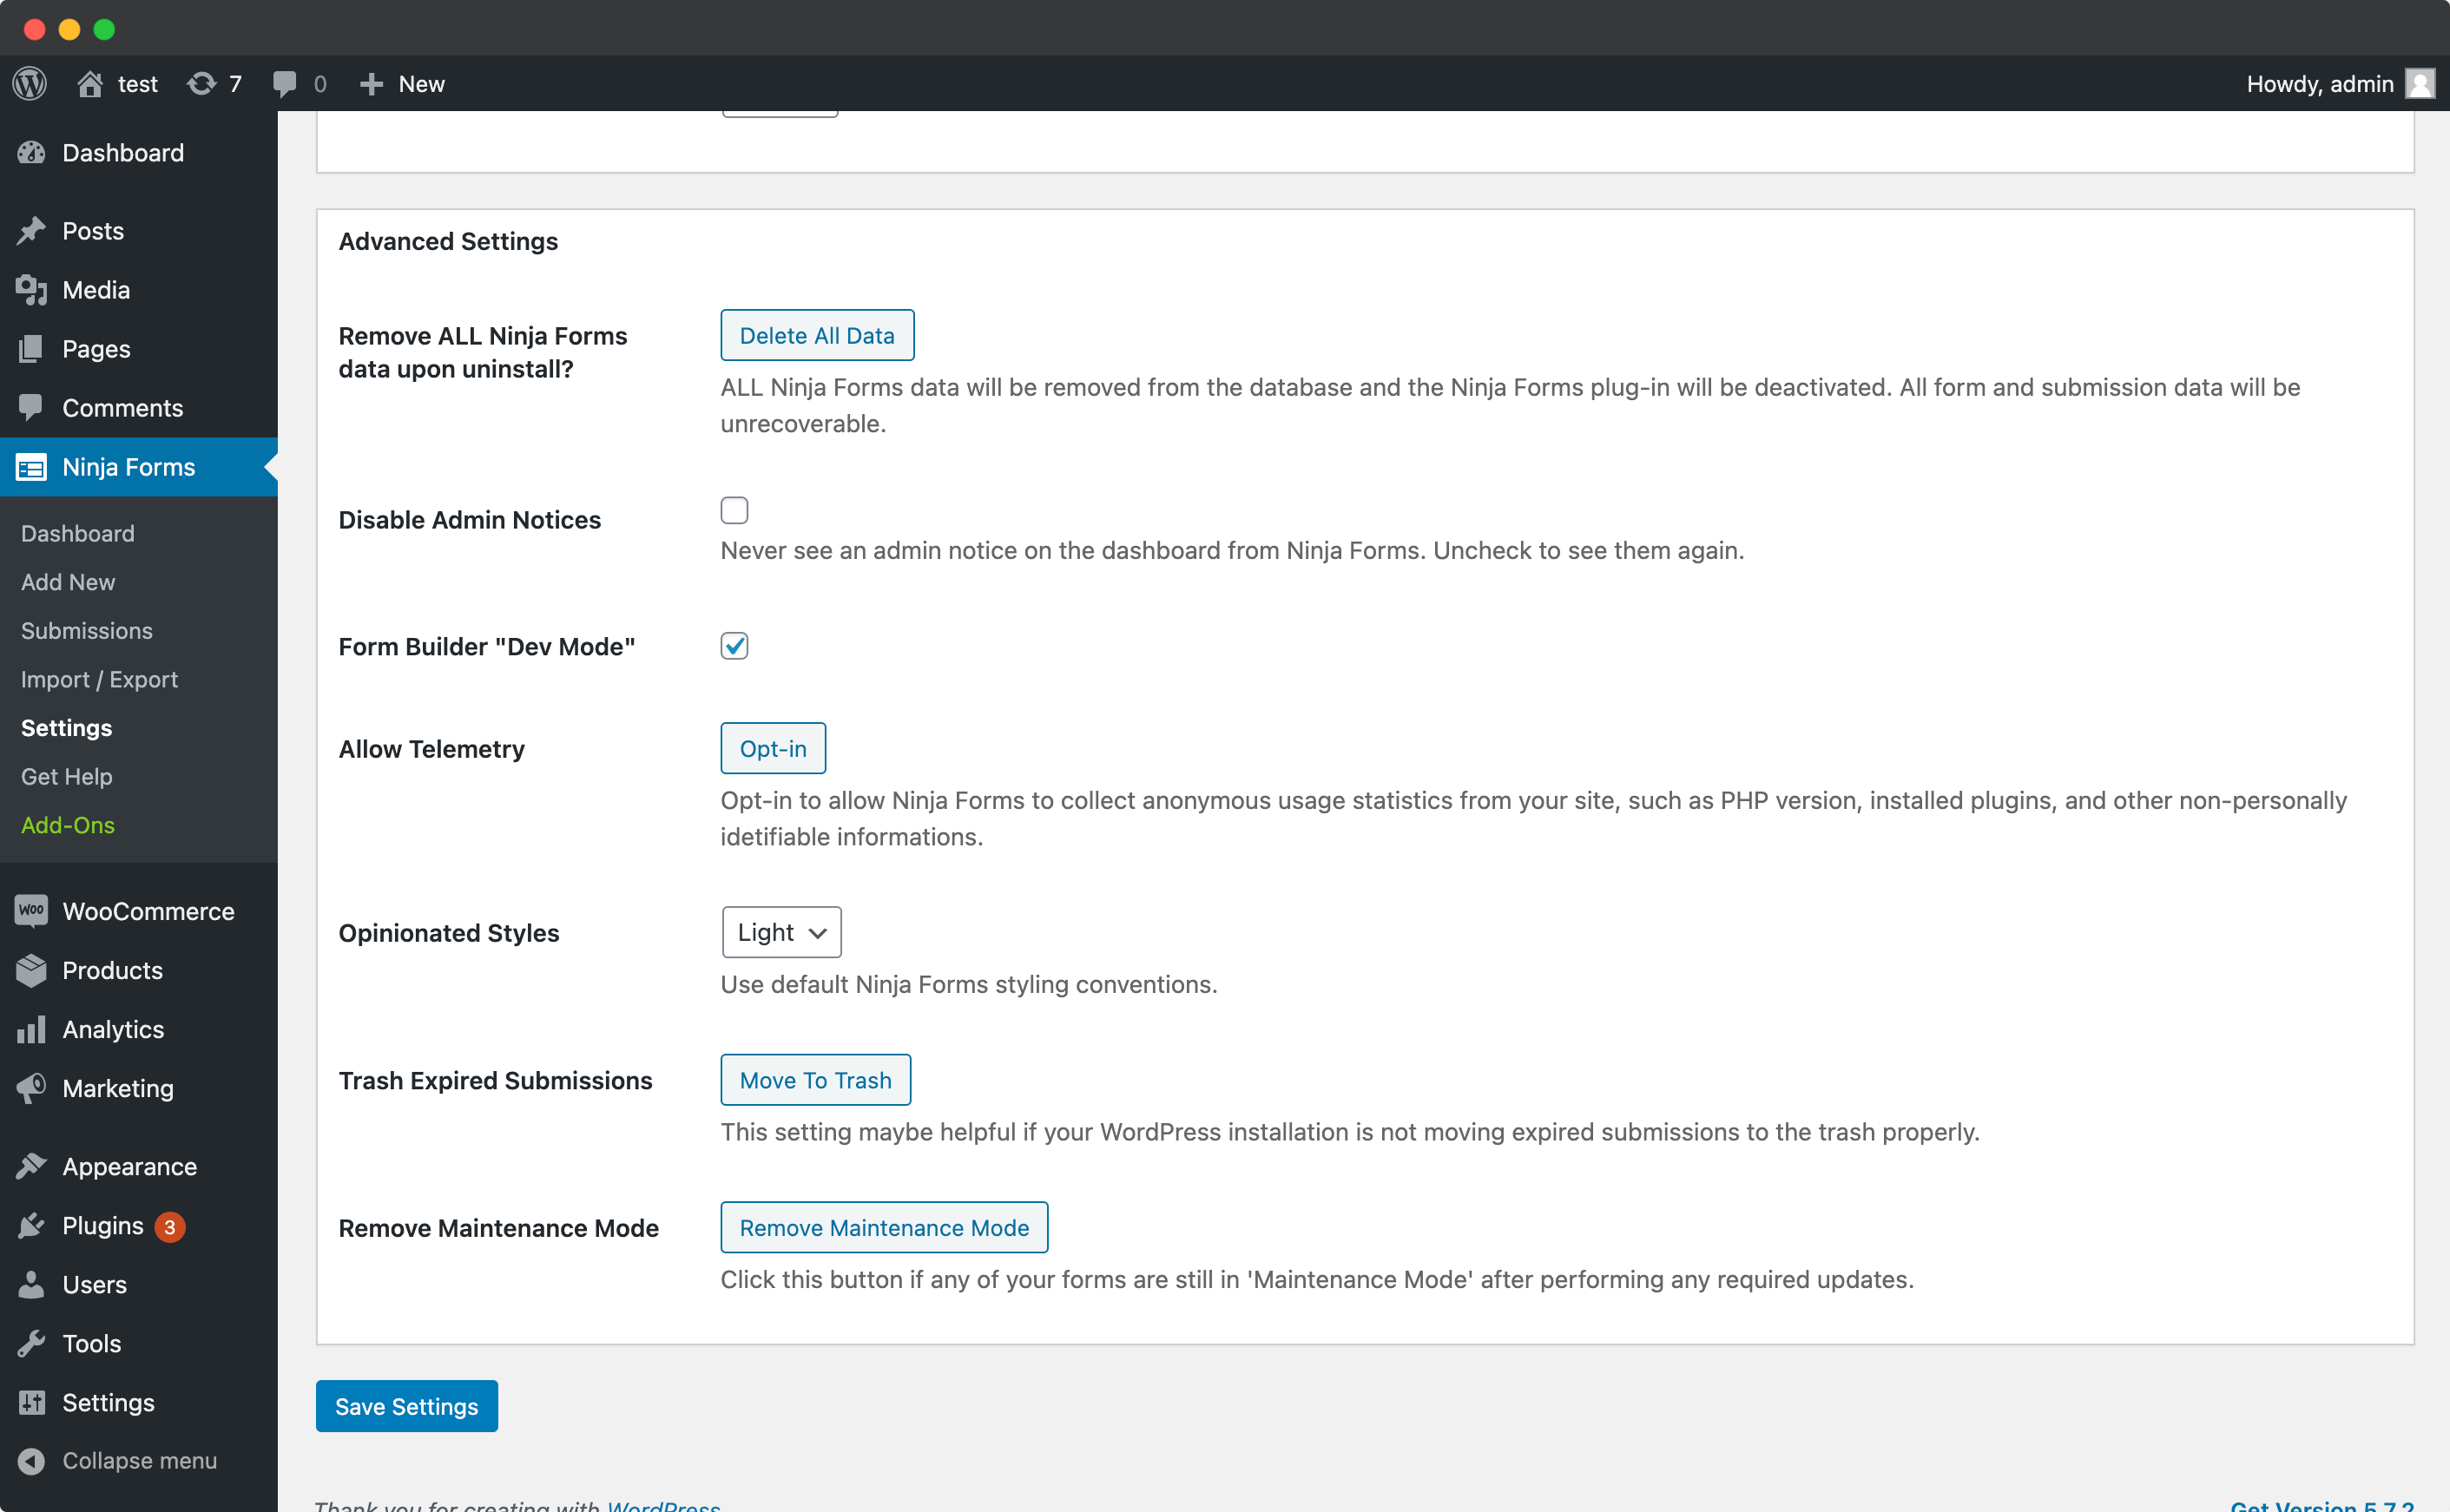
Enable Dev Mode
On your WordPress dashboard, click on the 'Ninja Forms' tab, followed by 'Settings'. Here, scroll down to 'Advanced Settings' and check the box for 'Form Builder "Dev Mode"'. This will be required when using the name attribute for your input fields.
Create Address Inputs
Add address input fields to your form. To do so, select the 'Single Line Text' field and drag it into the form. Once clicked, you can update the label text.
A basic address form to capture a correct UK address should have the following fields:
- Address line one (required)
- Address line two
- Address line three
- Post town (required)
- Postcode (required)
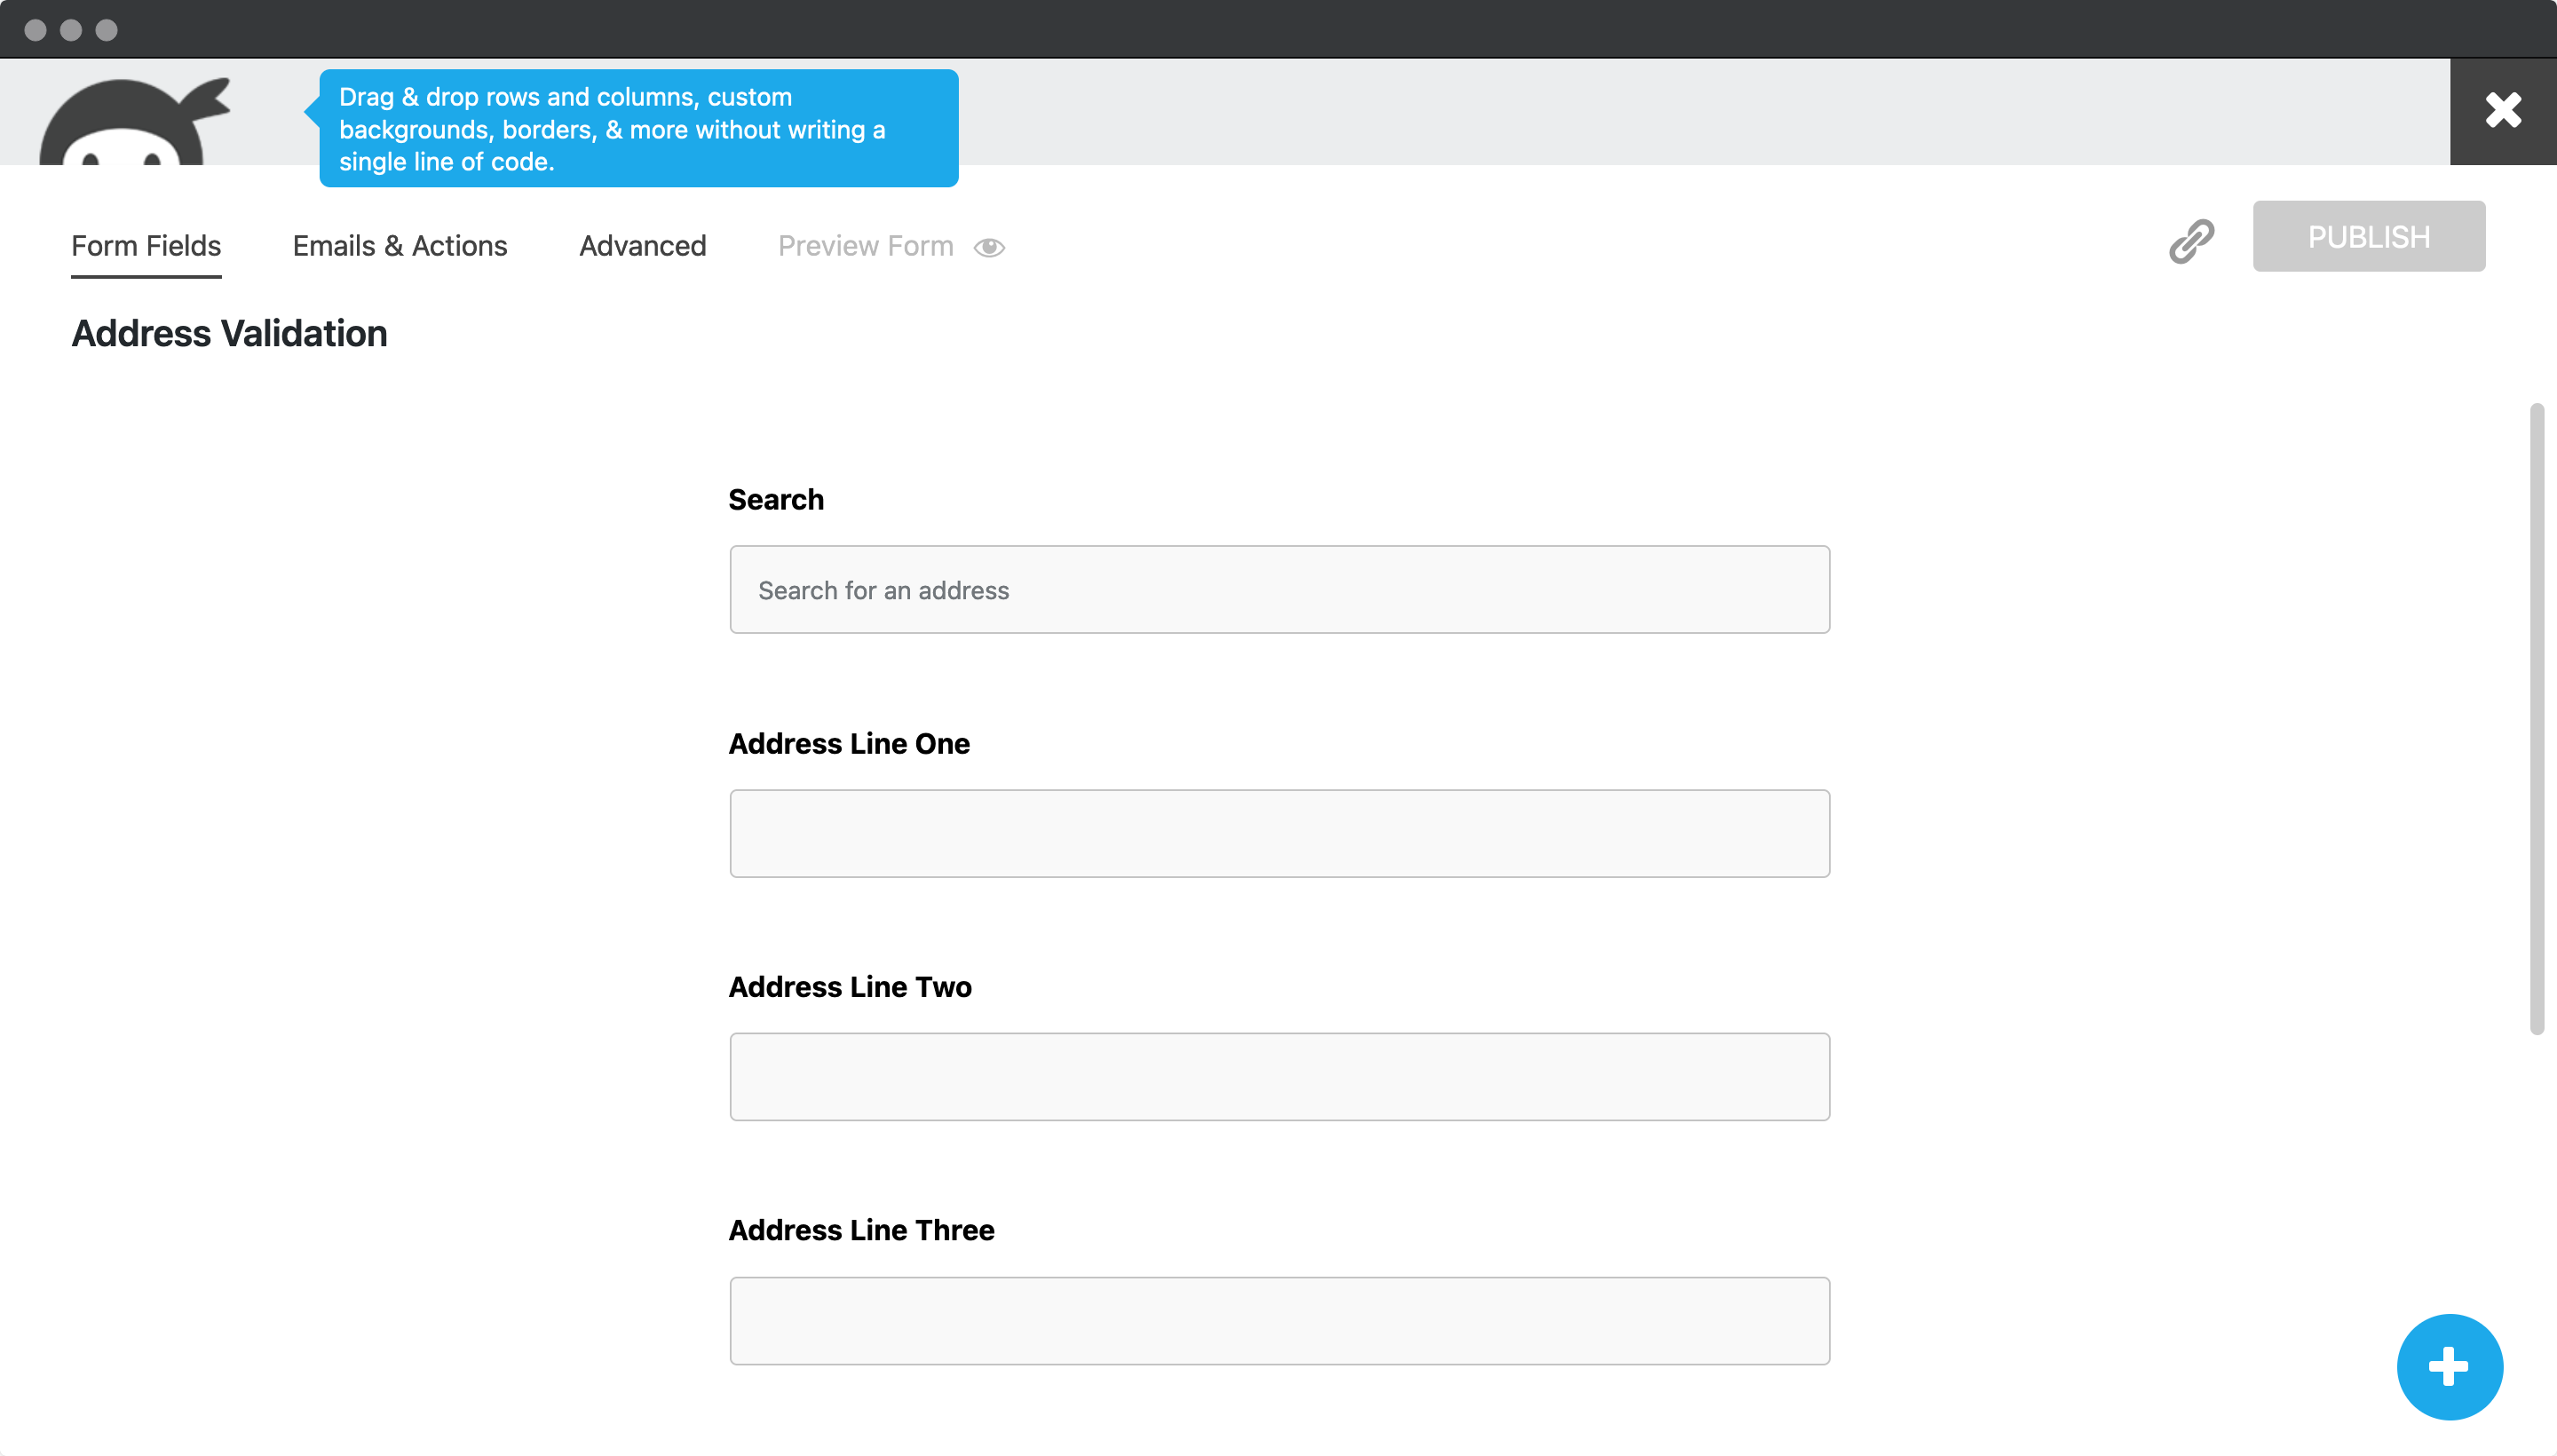
You can optionally include additional fields, which are listed in the Address data guide.
Add Custom Name Attributes
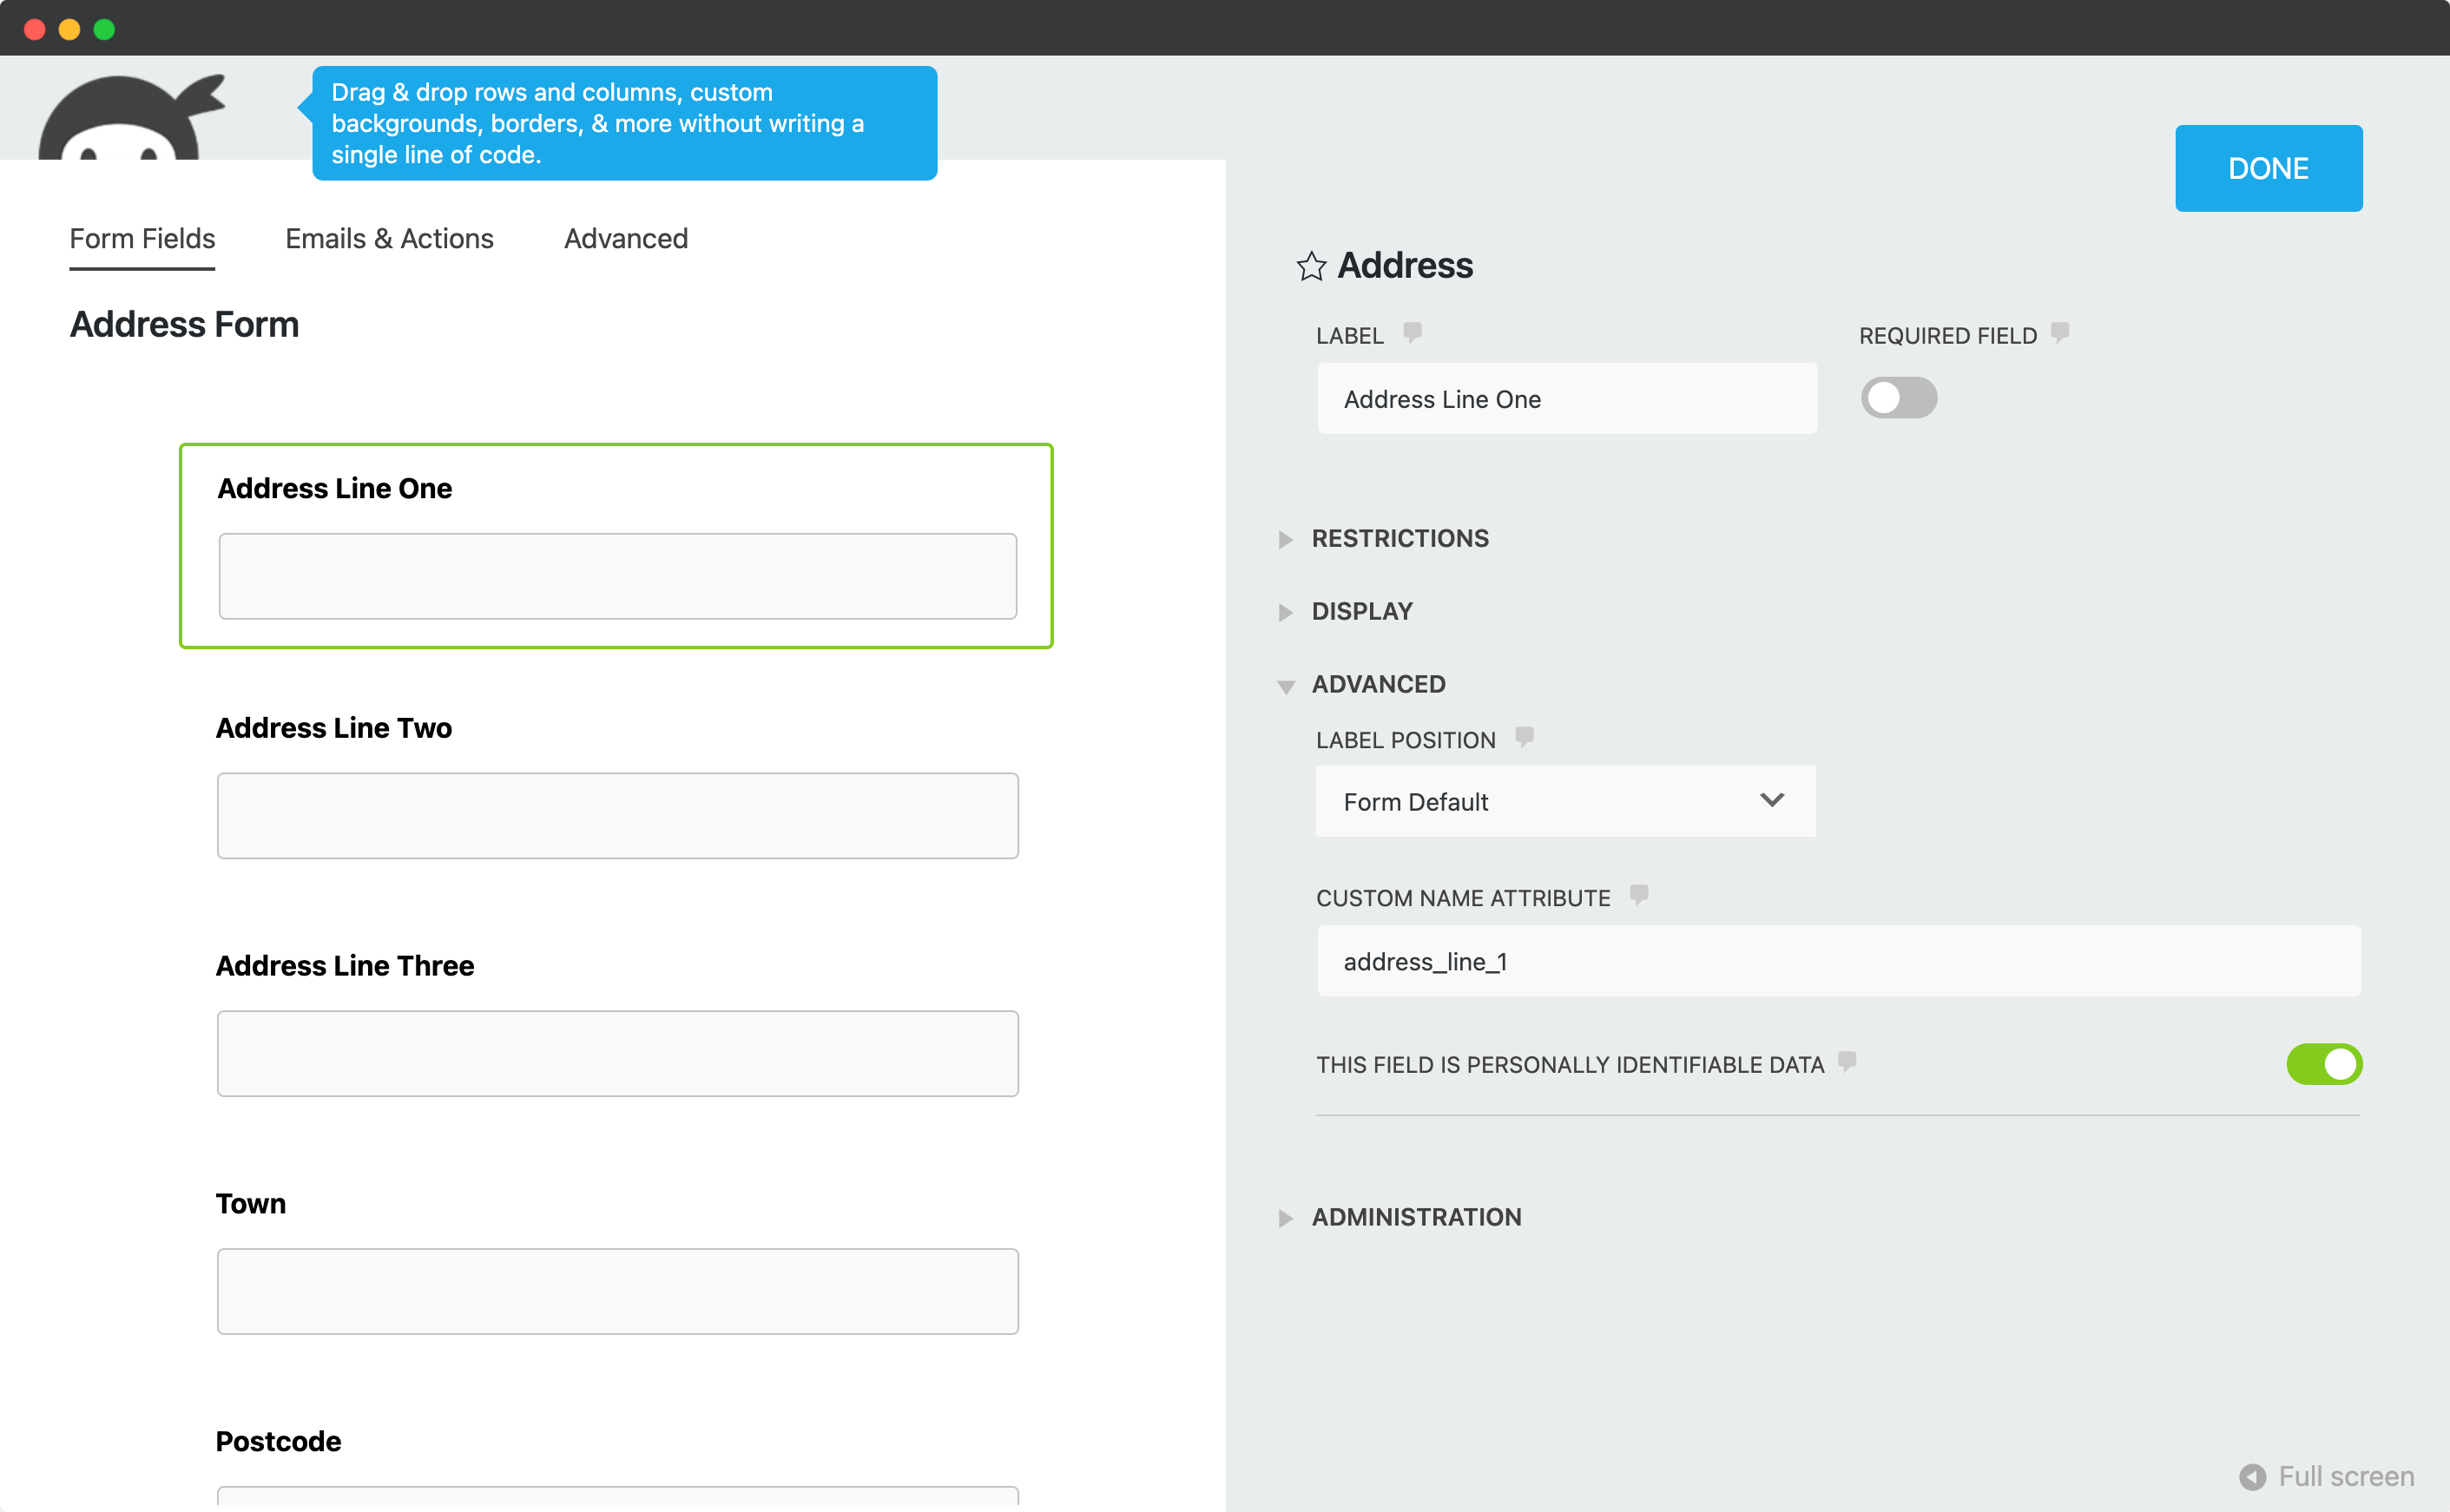
For Address Finder to identify the output fields, add name attributes to your address fields. To do so, click on the address field, and then the 'Advanced' dropdown. Here, you will find the CUSTOM NAME ATTRIBUTE field, which you can update. Remember to click on 'DONE' when complete.
Add Address Finder
Install and Initialise Plugin
On the WordPress admin dashboard, click on the 'Pages' tab, followed by 'Add New'. Now, click on the 'Add block' icon and look for the 'Custom HTML' option.
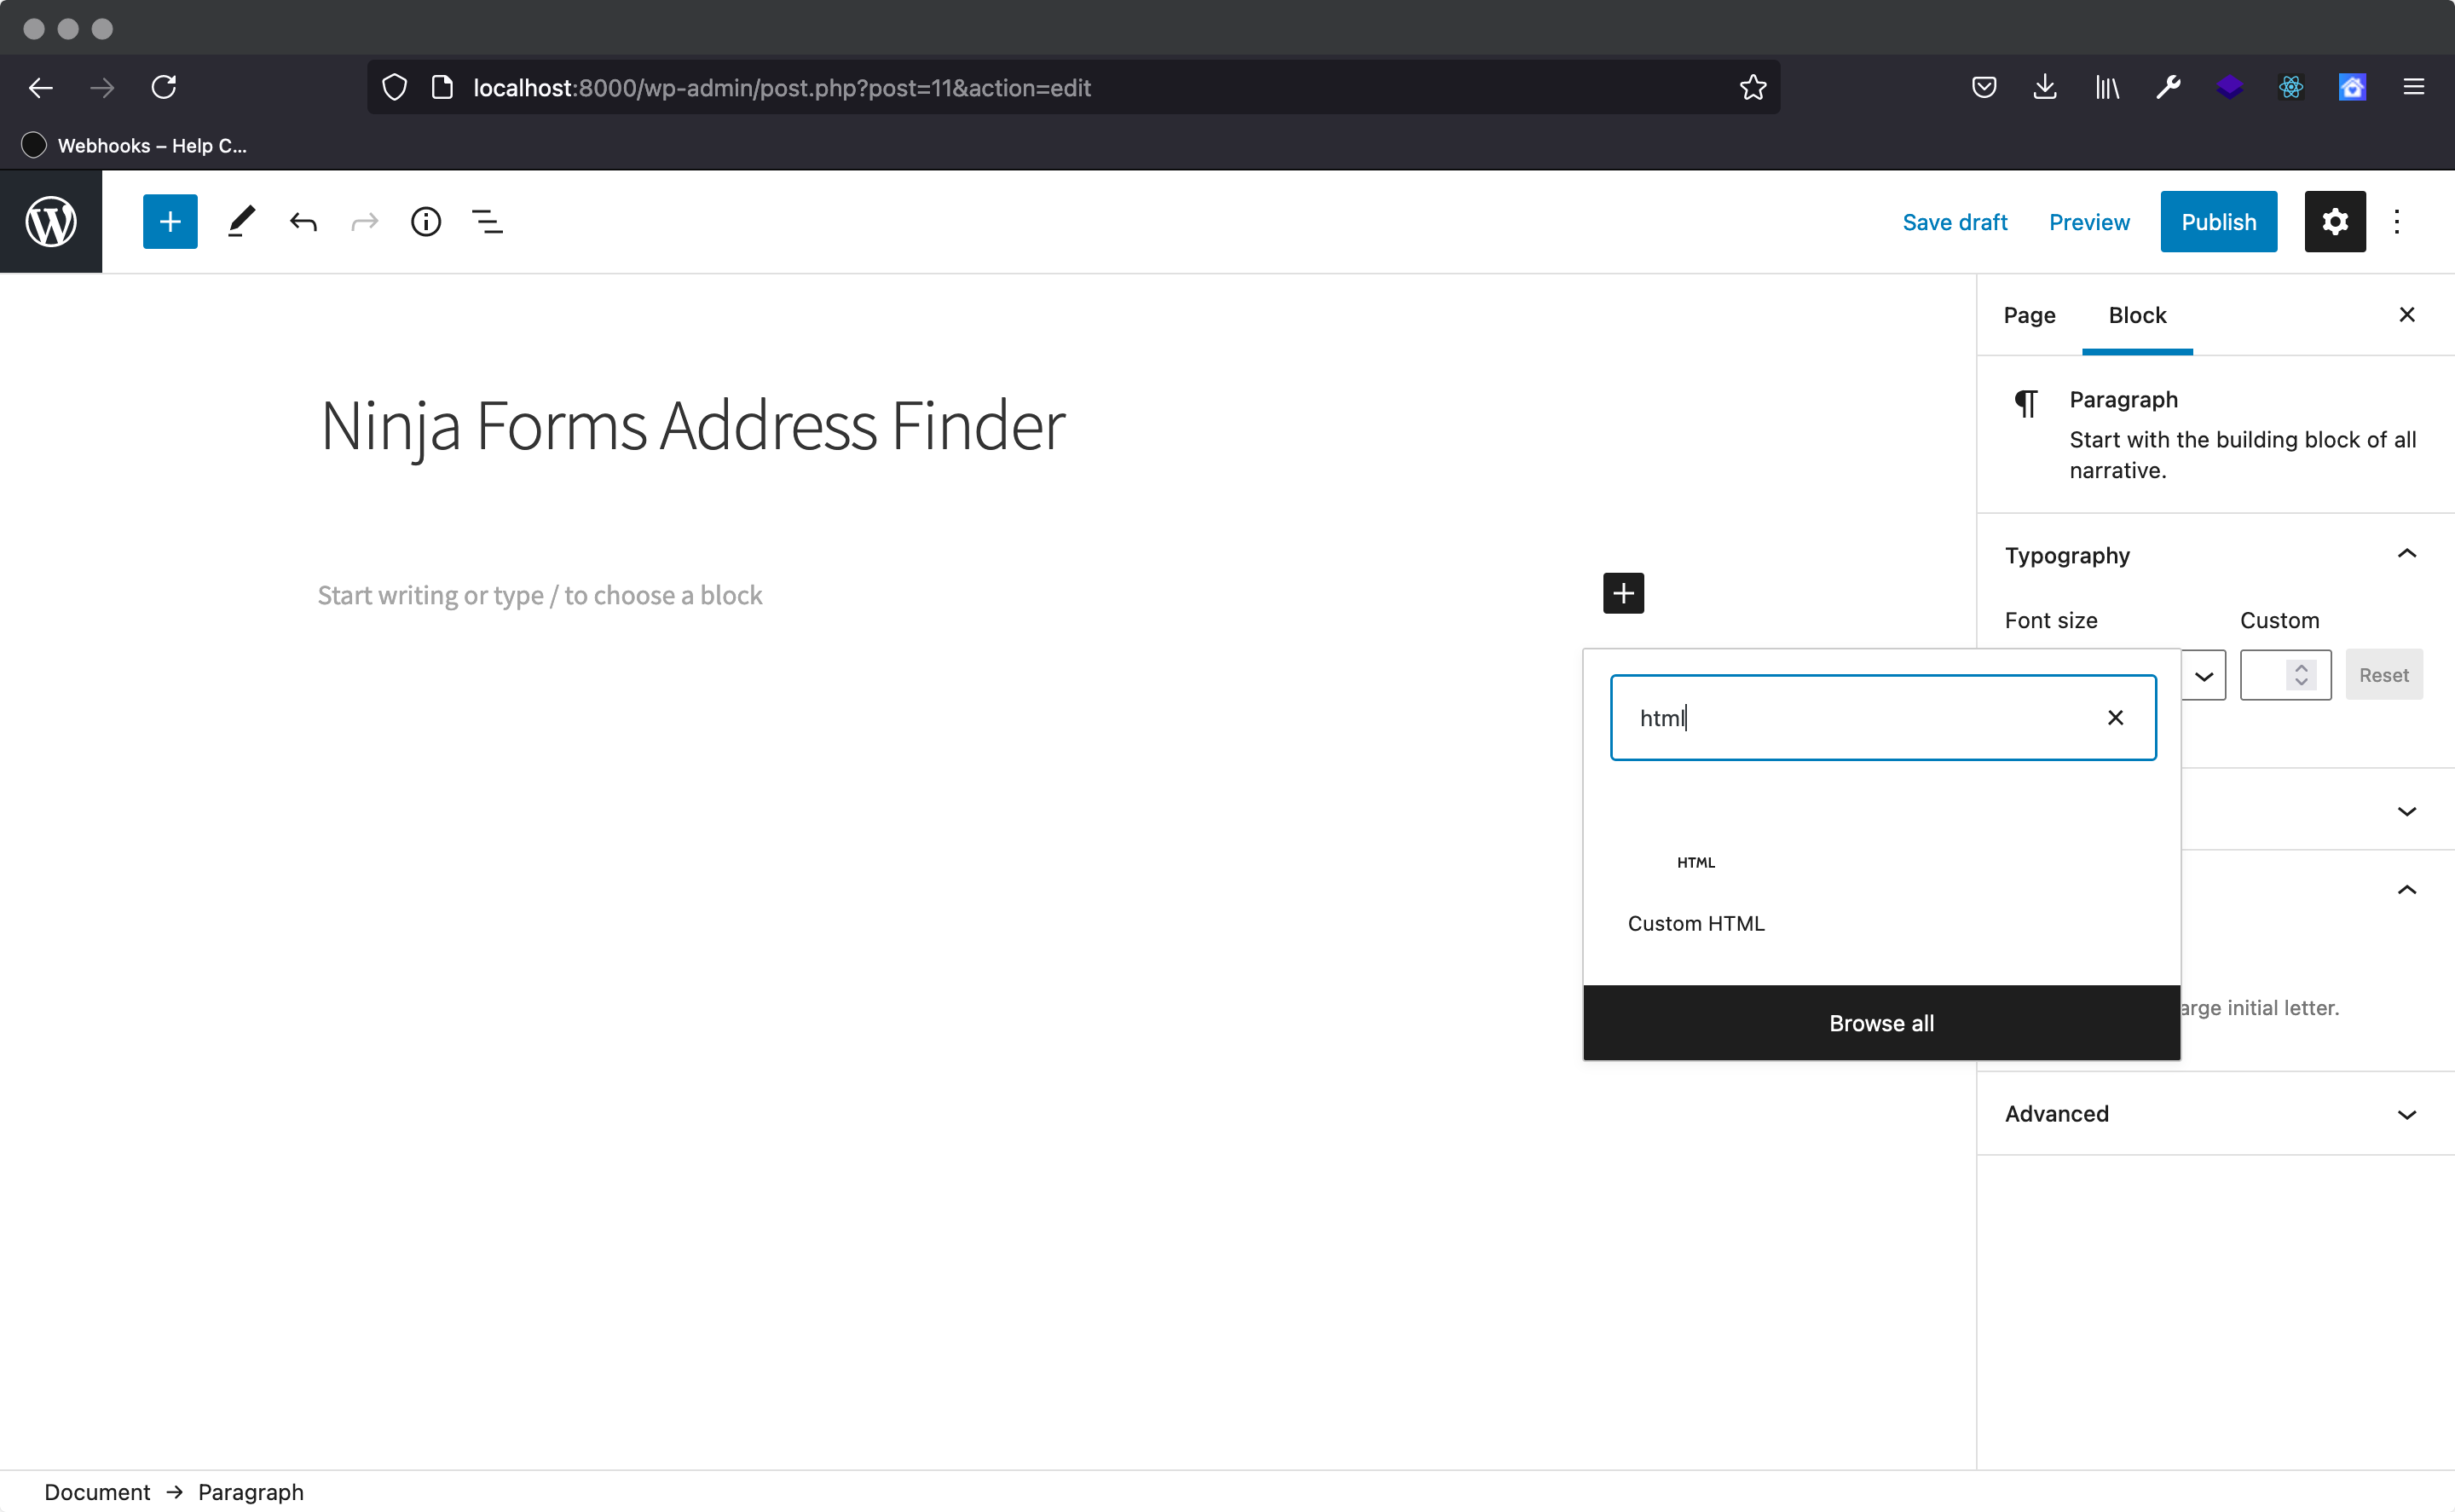
Subsequently, add the following two script tags within the HTML block to load the plugin and then to initialise it.
Lastly, click on ‘Append a Ninja Form’ dropdown which is on the ‘Page’ tab and select your Ninja Form.
<script src="https://cdn.jsdelivr.net/npm/@ideal-postcodes/address-finder-bundled"></script>

<script>
	document.addEventListener("DOMContentLoaded", function (event) {
		jQuery(document).on("nfFormReady", function () {
			IdealPostcodes.AddressFinder.setup({
				apiKey: "ak_test",
				outputFields: {
					line_1: 'input[name="address_line_one"]',
					line_2: 'input[name="address_line_two"]',
					line_3: 'input[name="address_line_three"]',
					post_town: 'input[name="post_town"]',
					postcode: 'input[name="postcode"]',
				},
			});
		});
	});
</script>
Take special care to:
- Insert your API Key in the
apiKeyfield - Match the names of your address fields. If your Address Line One has the shortcode
[text* line_1], ensure thatline_1reads'input[name="line_1"]' - Ensure
inputFieldpoints to the same field asline_1to have the Address Finder appear there
If you wish to add an additional field, include the parameter name from our documentation. For instance, adding a county field with name county will look like:
outputFields: {
  line_1: 'input[name="line_1"]',
  line_2: 'input[name="line_2"]',
  line_3: 'input[name="line_3"]',
  post_town: 'input[name="post_town"]',
  county: 'input[name="county"]',
  postcode: 'input[name="postcode"]'
}
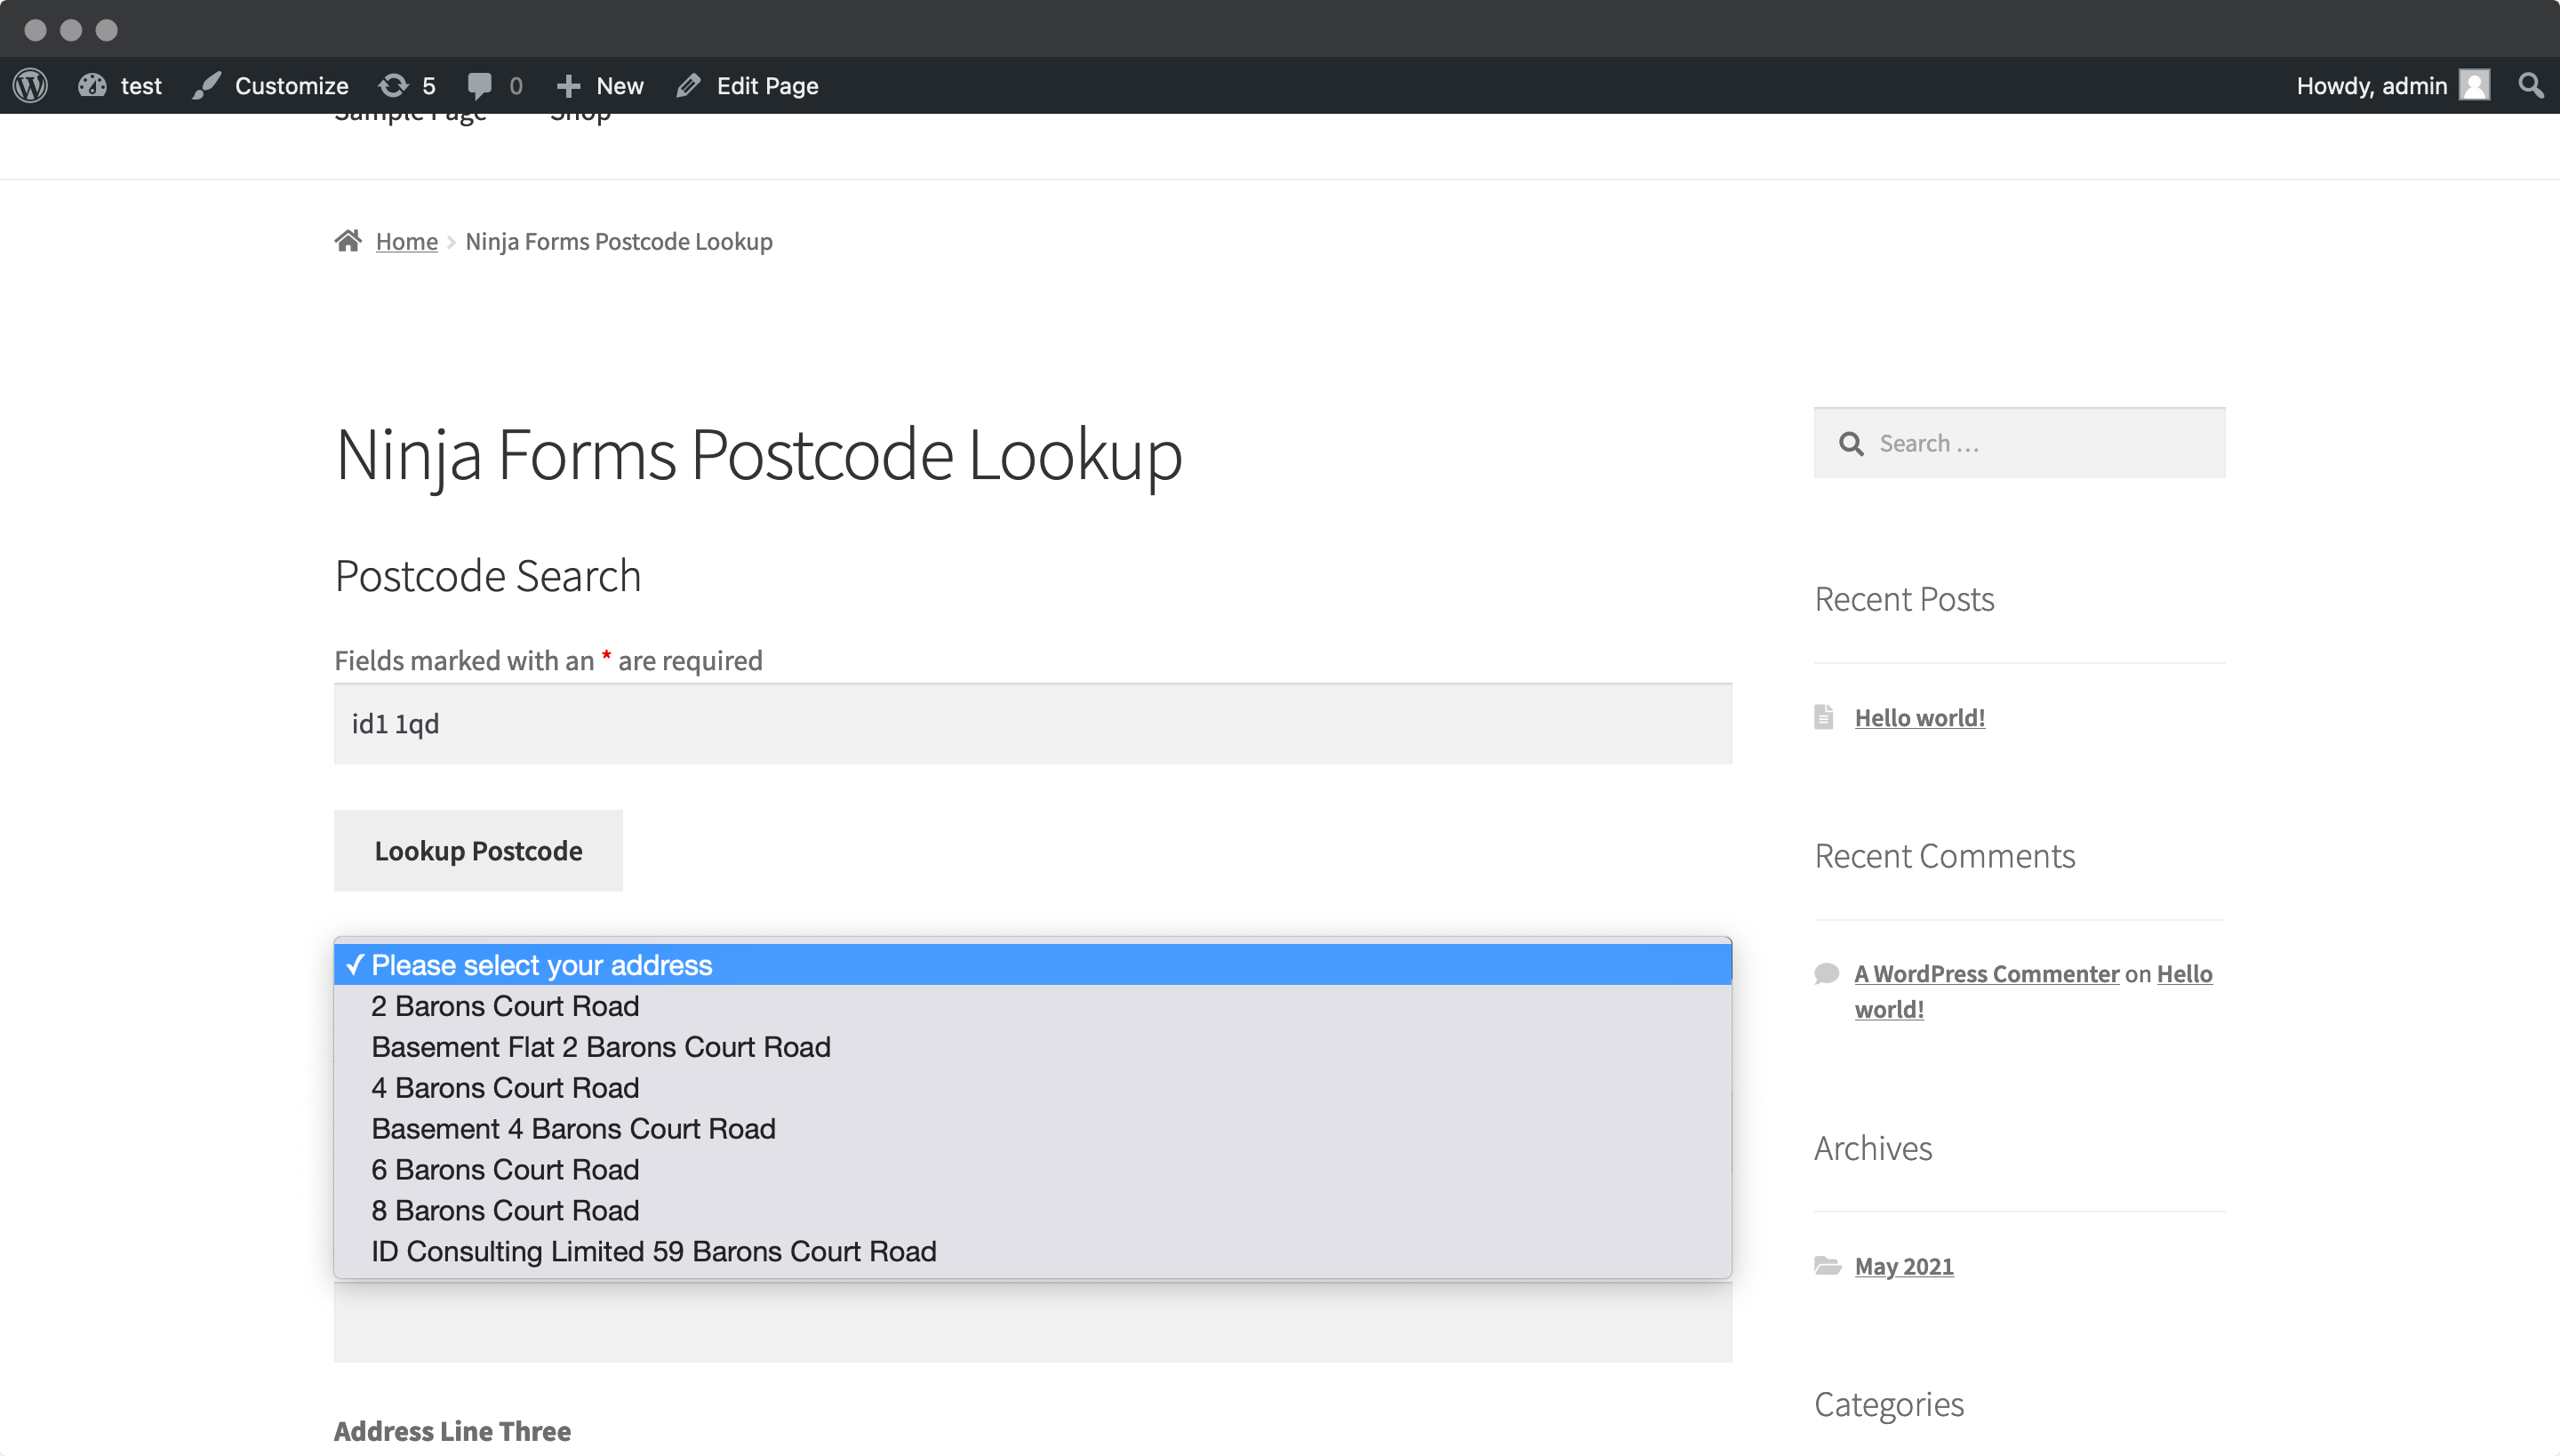
Add Postcode Lookup
Add Postcode Lookup HTML elements
In your Ninja Forms dashboard, click on 'ADD NEW' to create a new form.
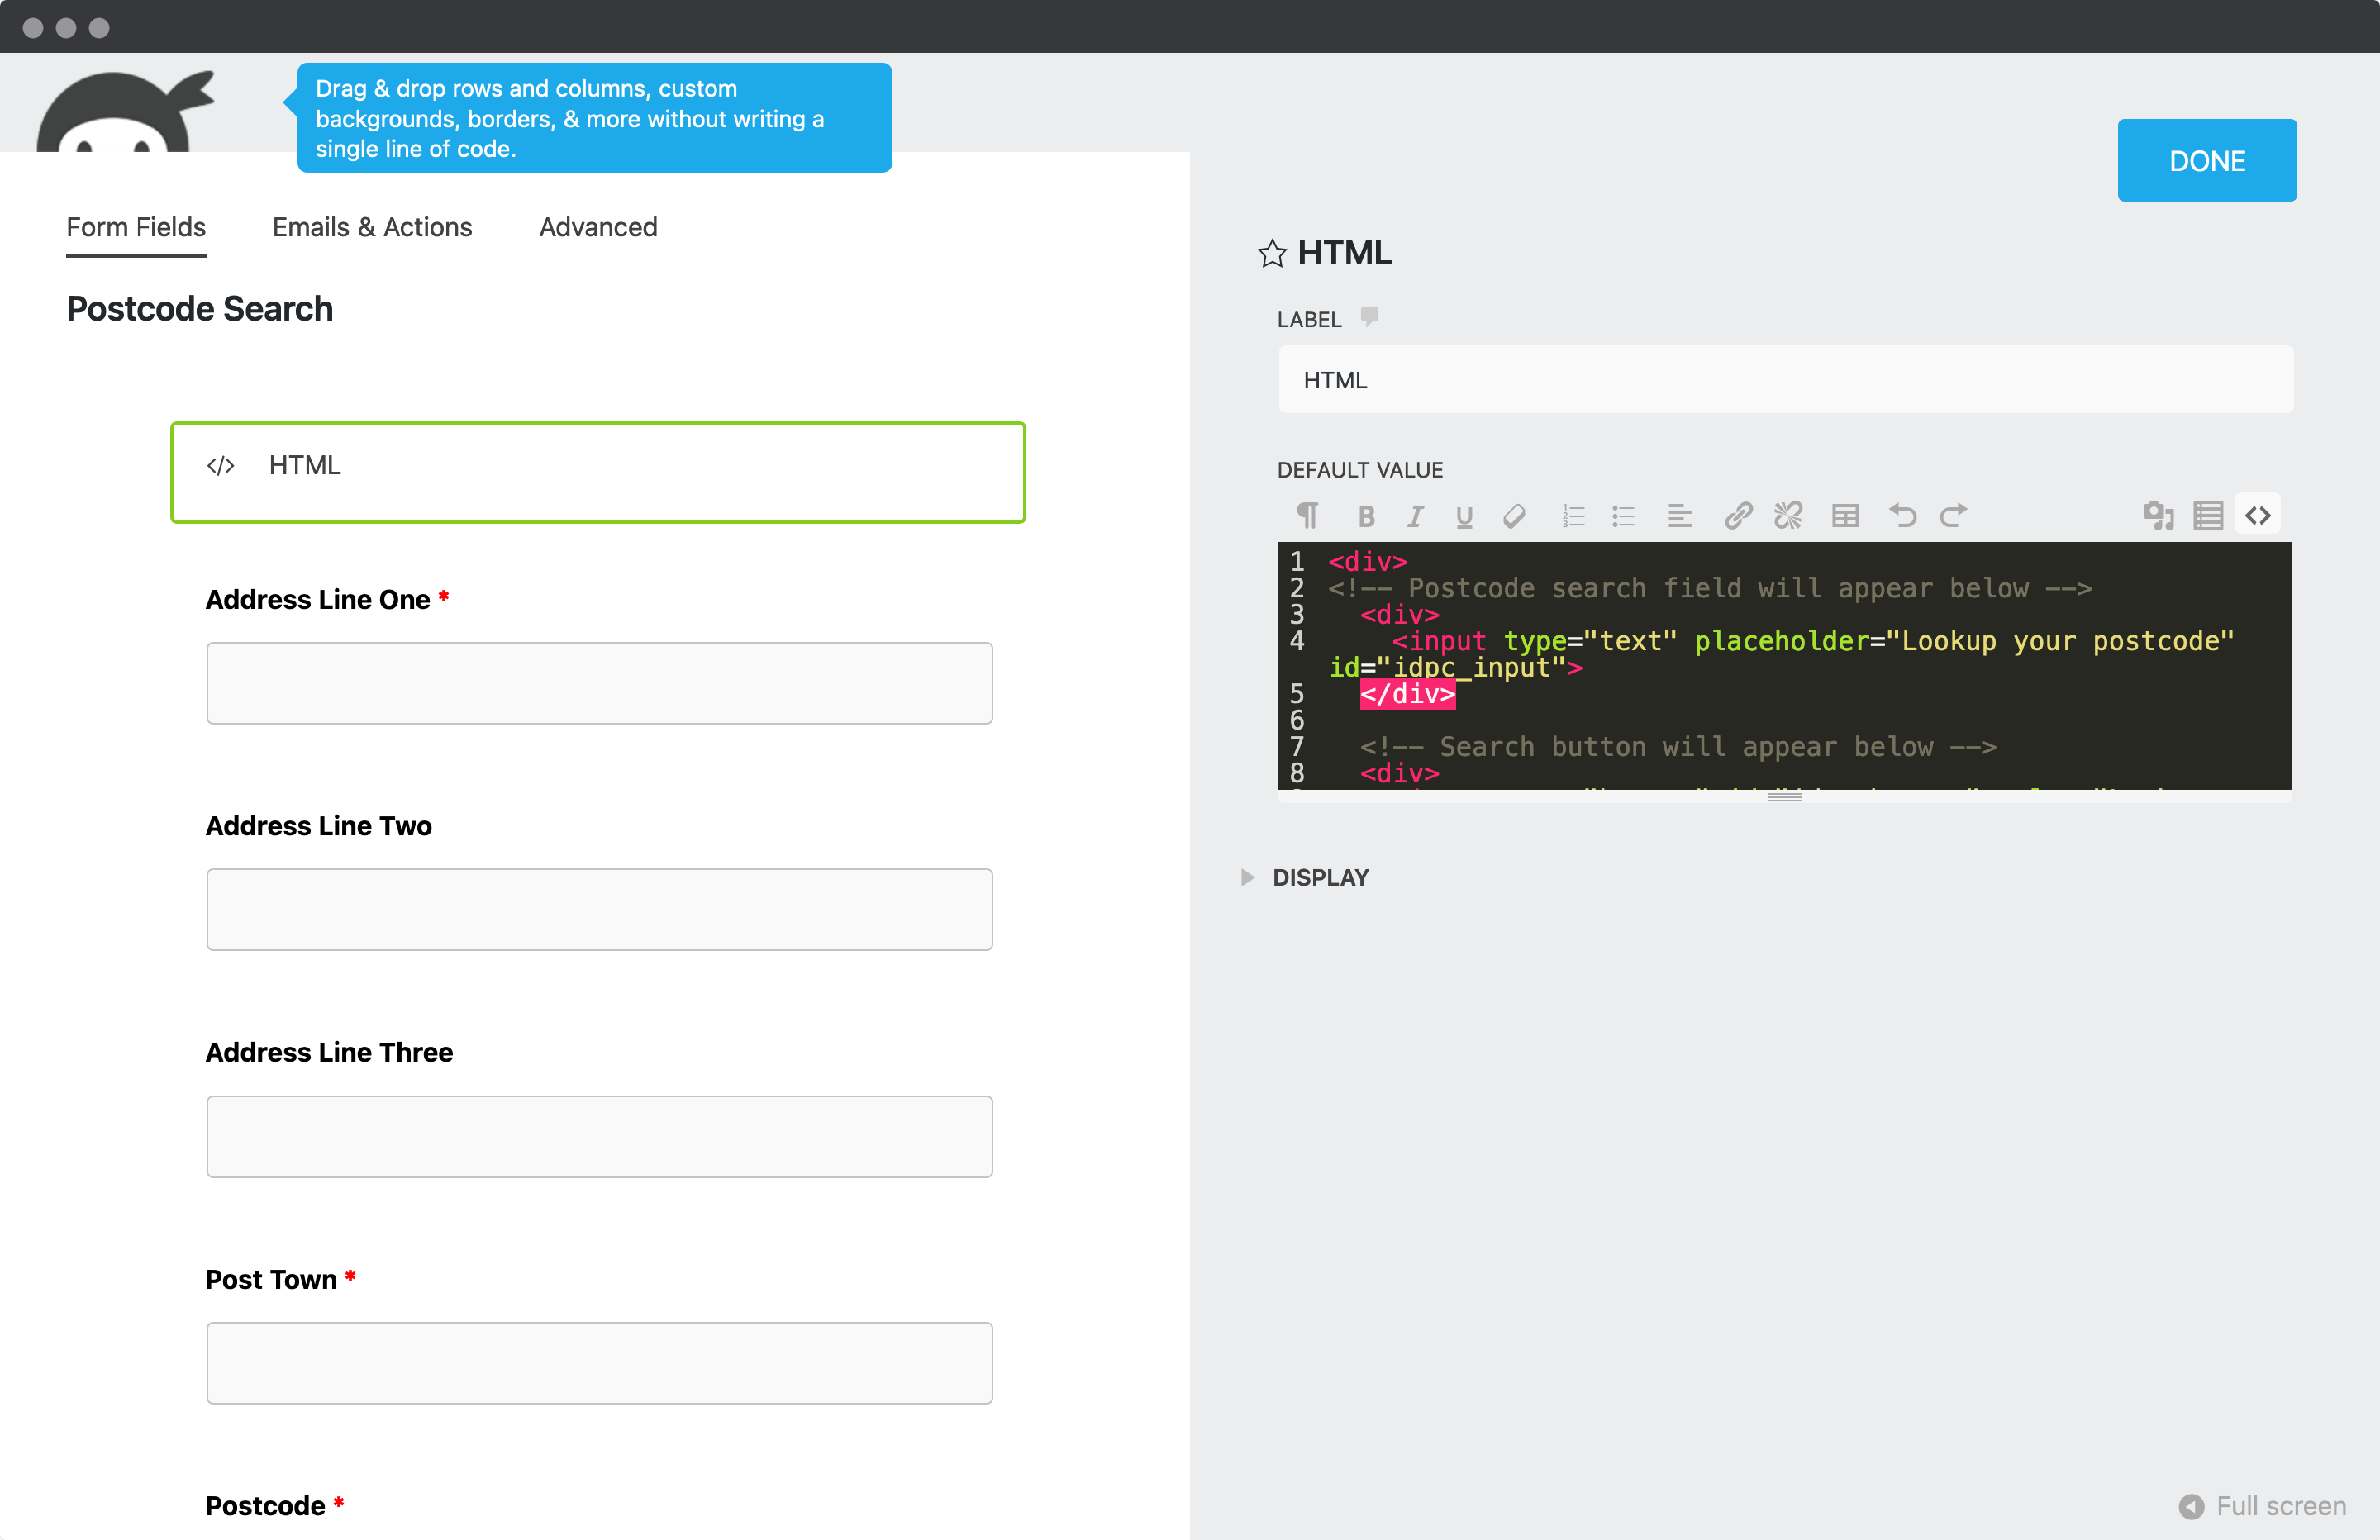
On top of your address fields, add a HTML layout field. Under the HTML panel, click on the code editor button and paste in the below HTML to scaffold your postcode search field, search button and address dropdown for the plugin.
<div>
	<!-- Postcode search field will appear below -->
	<div>
		<input
			type="text"
			placeholder="Lookup your postcode"
			id="idpc_input"
		/>
	</div>

	<br />

	<!-- Search button will appear below -->
	<div>
		<input
			type="button"
			id="idpc_button"
			value="Lookup Postcode"
		/>
	</div>

	<br />

	<!-- Address dropdown field will appear below -->
	<div id="idpc_dropdown"></div>
	<!-- Any error messages will appear here -->
	<div id="idpc"></div>
</div>
Install Plugin
On the WordPress admin dashboard, click on the 'Pages' tab and click on 'Add New'. Next, click on the 'Add block' icon and look for the 'Custom HTML' option. Paste in the below script tag:
<script src="https://cdn.jsdelivr.net/npm/@ideal-postcodes/postcode-lookup-bundled@2"></script>

<script>
	document.addEventListener("DOMContentLoaded", function (event) {
		jQuery(document).on("nfFormReady", function () {
			IdealPostcodes.PostcodeLookup.setup({
				apiKey: "ak_test",
				context: "#idpc",
				input: "#idpc_input",
				button: "#idpc_button",
				selectContainer: "#idpc_dropdown",
				outputFields: {
					line_1: 'input[name="address_line_one"]',
					line_2: 'input[name="address_line_two"]',
					line_3: 'input[name="address_line_three"]',
					post_town: 'input[name="post_town"]',
					postcode: 'input[name="postcode"]',
				},
			});
		});
	});
</script>
Finally, click on ‘Append a Ninja Form’ dropdown which is on the ‘Page’ tab and select your Ninja Form.
Take special care to:
Be Sure to:
- Insert your API Key in the
apiKeyfield - Match the names of your address fields. If your Address Line One has the shortcode
[text* line_1], ensure thatline_1reads'input[name="line_1"]' - Ensure
inputFieldpoints to the same field asline_1to have the Address Finder appear there
If you wish to add an additional field, choose a parameter from our UK Address data guide. For instance, adding a county field with name county will look like:
outputFields: {
  line_1: 'input[name="line_1"]',
  line_2: 'input[name="line_2"]',
  line_3: 'input[name="line_3"]',
  post_town: 'input[name="post_town"]',
  county: 'input[name="county"]',
  postcode: 'input[name="postcode"]'
}
Configuration
See our Address Finder Plugin Documentation if you wish to customise Address Finder.
See our Postcode Lookup Plugin Documentation if you wish to customise Postcode Lookup.
Still need help? Contact our support team via live chat on our website or email support@ideal-postcodes.co.uk.
