Installing One-Step Address Validation for Shopify
Add address validation to your Shopify checkout to improve completion rates and ensure accurate shipping information. This guide walks you through signing up for a free trial, installing the app, configuring it, and exploring advanced settings.
This plugin supports Address Finder, also known as the One-Step Address Validator on the Shopify App Store.
Shopify Plus Required: This app requires a Shopify Plus subscription due to checkout extensibility requirements. Learn more about Shopify Plus.
Demo
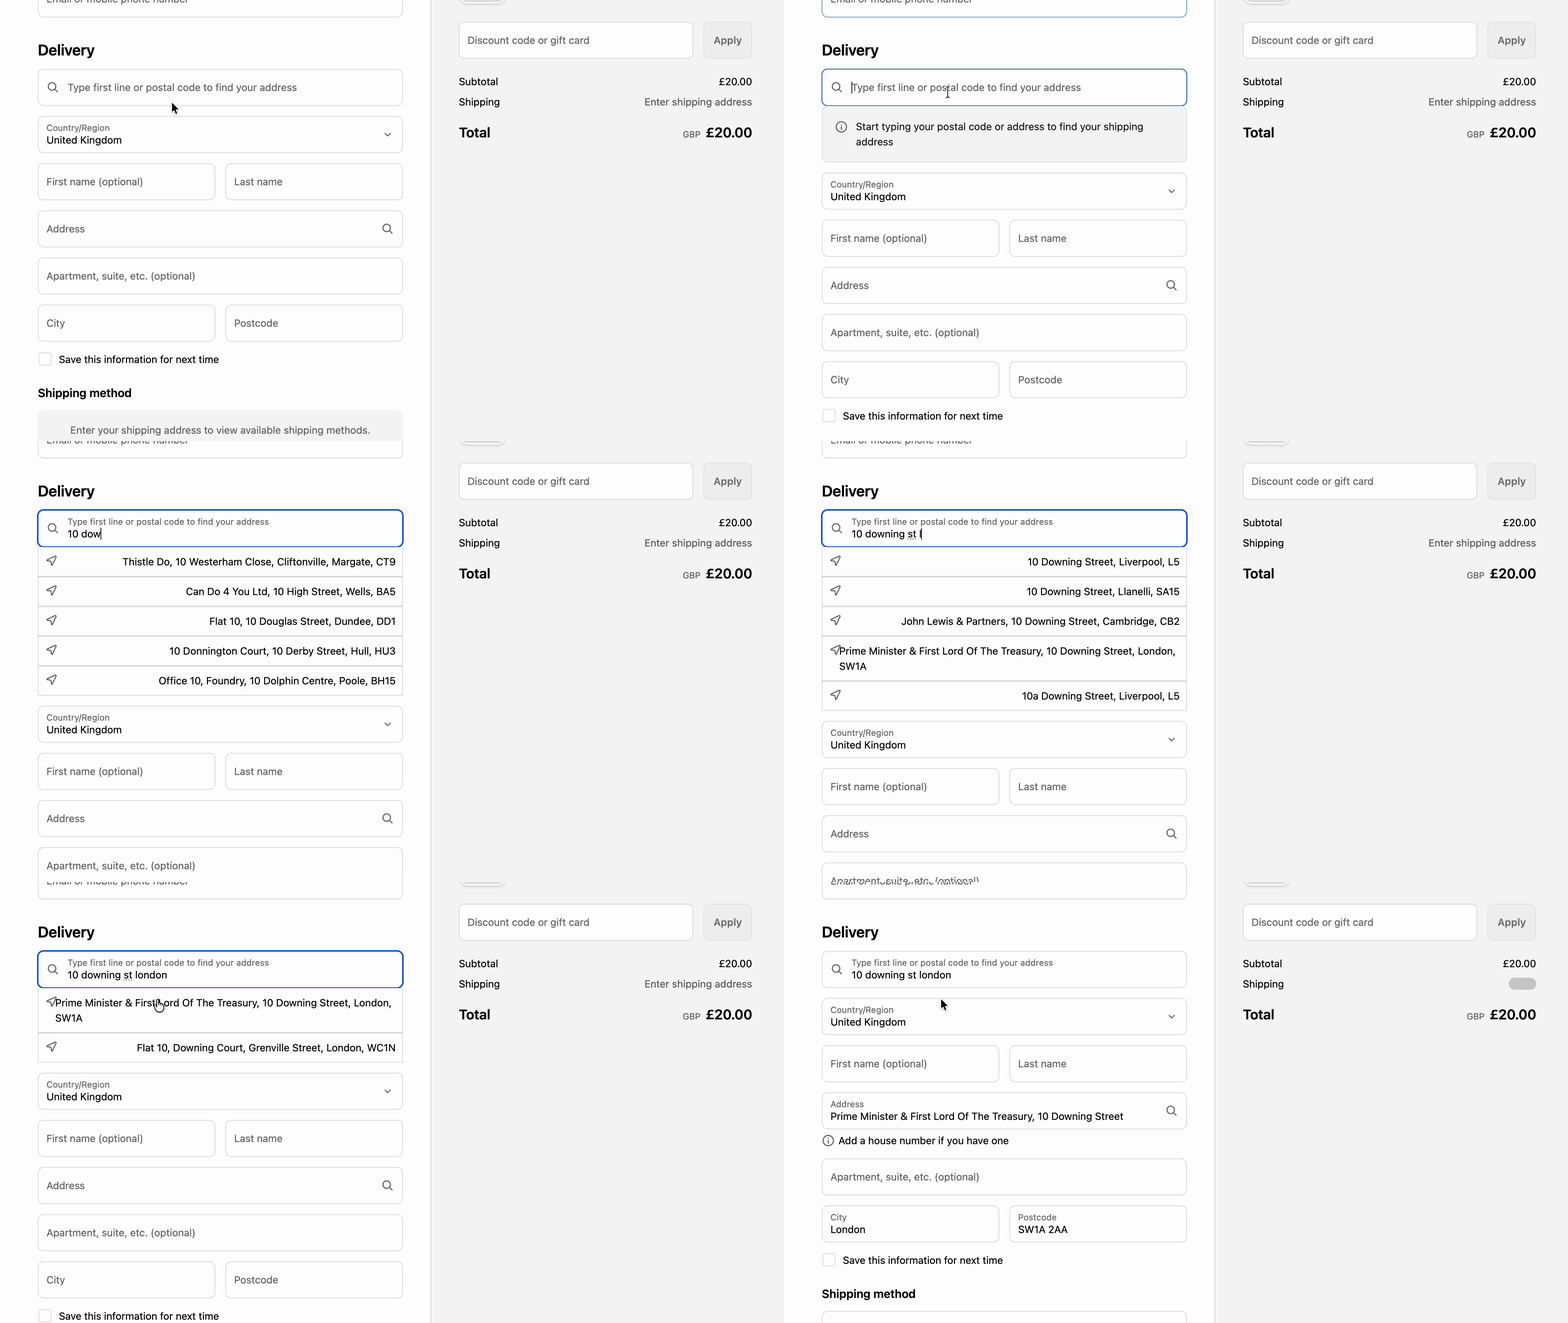
Features
Address Validation:
- Native address autocomplete in Shopify's checkout address fields
- Real-time address validation
- Automatic address formatting
Postcode Lookup:
- Find addresses by postcode at checkout
- Available for the United Kingdom, Ireland, Singapore and the Netherlands
- Supports Eircode (Ireland)
Address Filtering:
- Prevent certain addresses
- PO Boxes
- Military Addresses
- Rural routes (US only)
- Private mailboxes (US only)
Address Standardisation:
- Remove diacritics
- Prevent non-Latin characters
- Standardise address formatting
The app plugs into checkout in two independent places, each with its own setup step:
- Address autocompletion provider (Step 4) - powers address suggestions in Shopify's own address fields
- App block (Step 5) - powers address filtering, postcode lookup and the classic search box
Set up both to use the full feature set.
1. Sign up for a Free Trial and Get Your API Key
Before installing the app, you'll need an Ideal Postcodes API Key.
Steps:
- Sign Up: Visit ideal-postcodes.co.uk/sign-up
- Access Keys: Navigate to the KEYS section in your dashboard
- Copy API Key: Copy your API Key (format:
ak_xxxxxxxxxx) - save this for Step 3
2: Install the One-Step Address Validation App
Install the Ideal Postcodes One-Step Address Validation app from the Shopify App Store.
3. Add Your API Key
- Access App Settings: From the Shopify Administration page, navigate to Apps → One-Step Address Validation
- Open Settings: Click Settings in the app dashboard
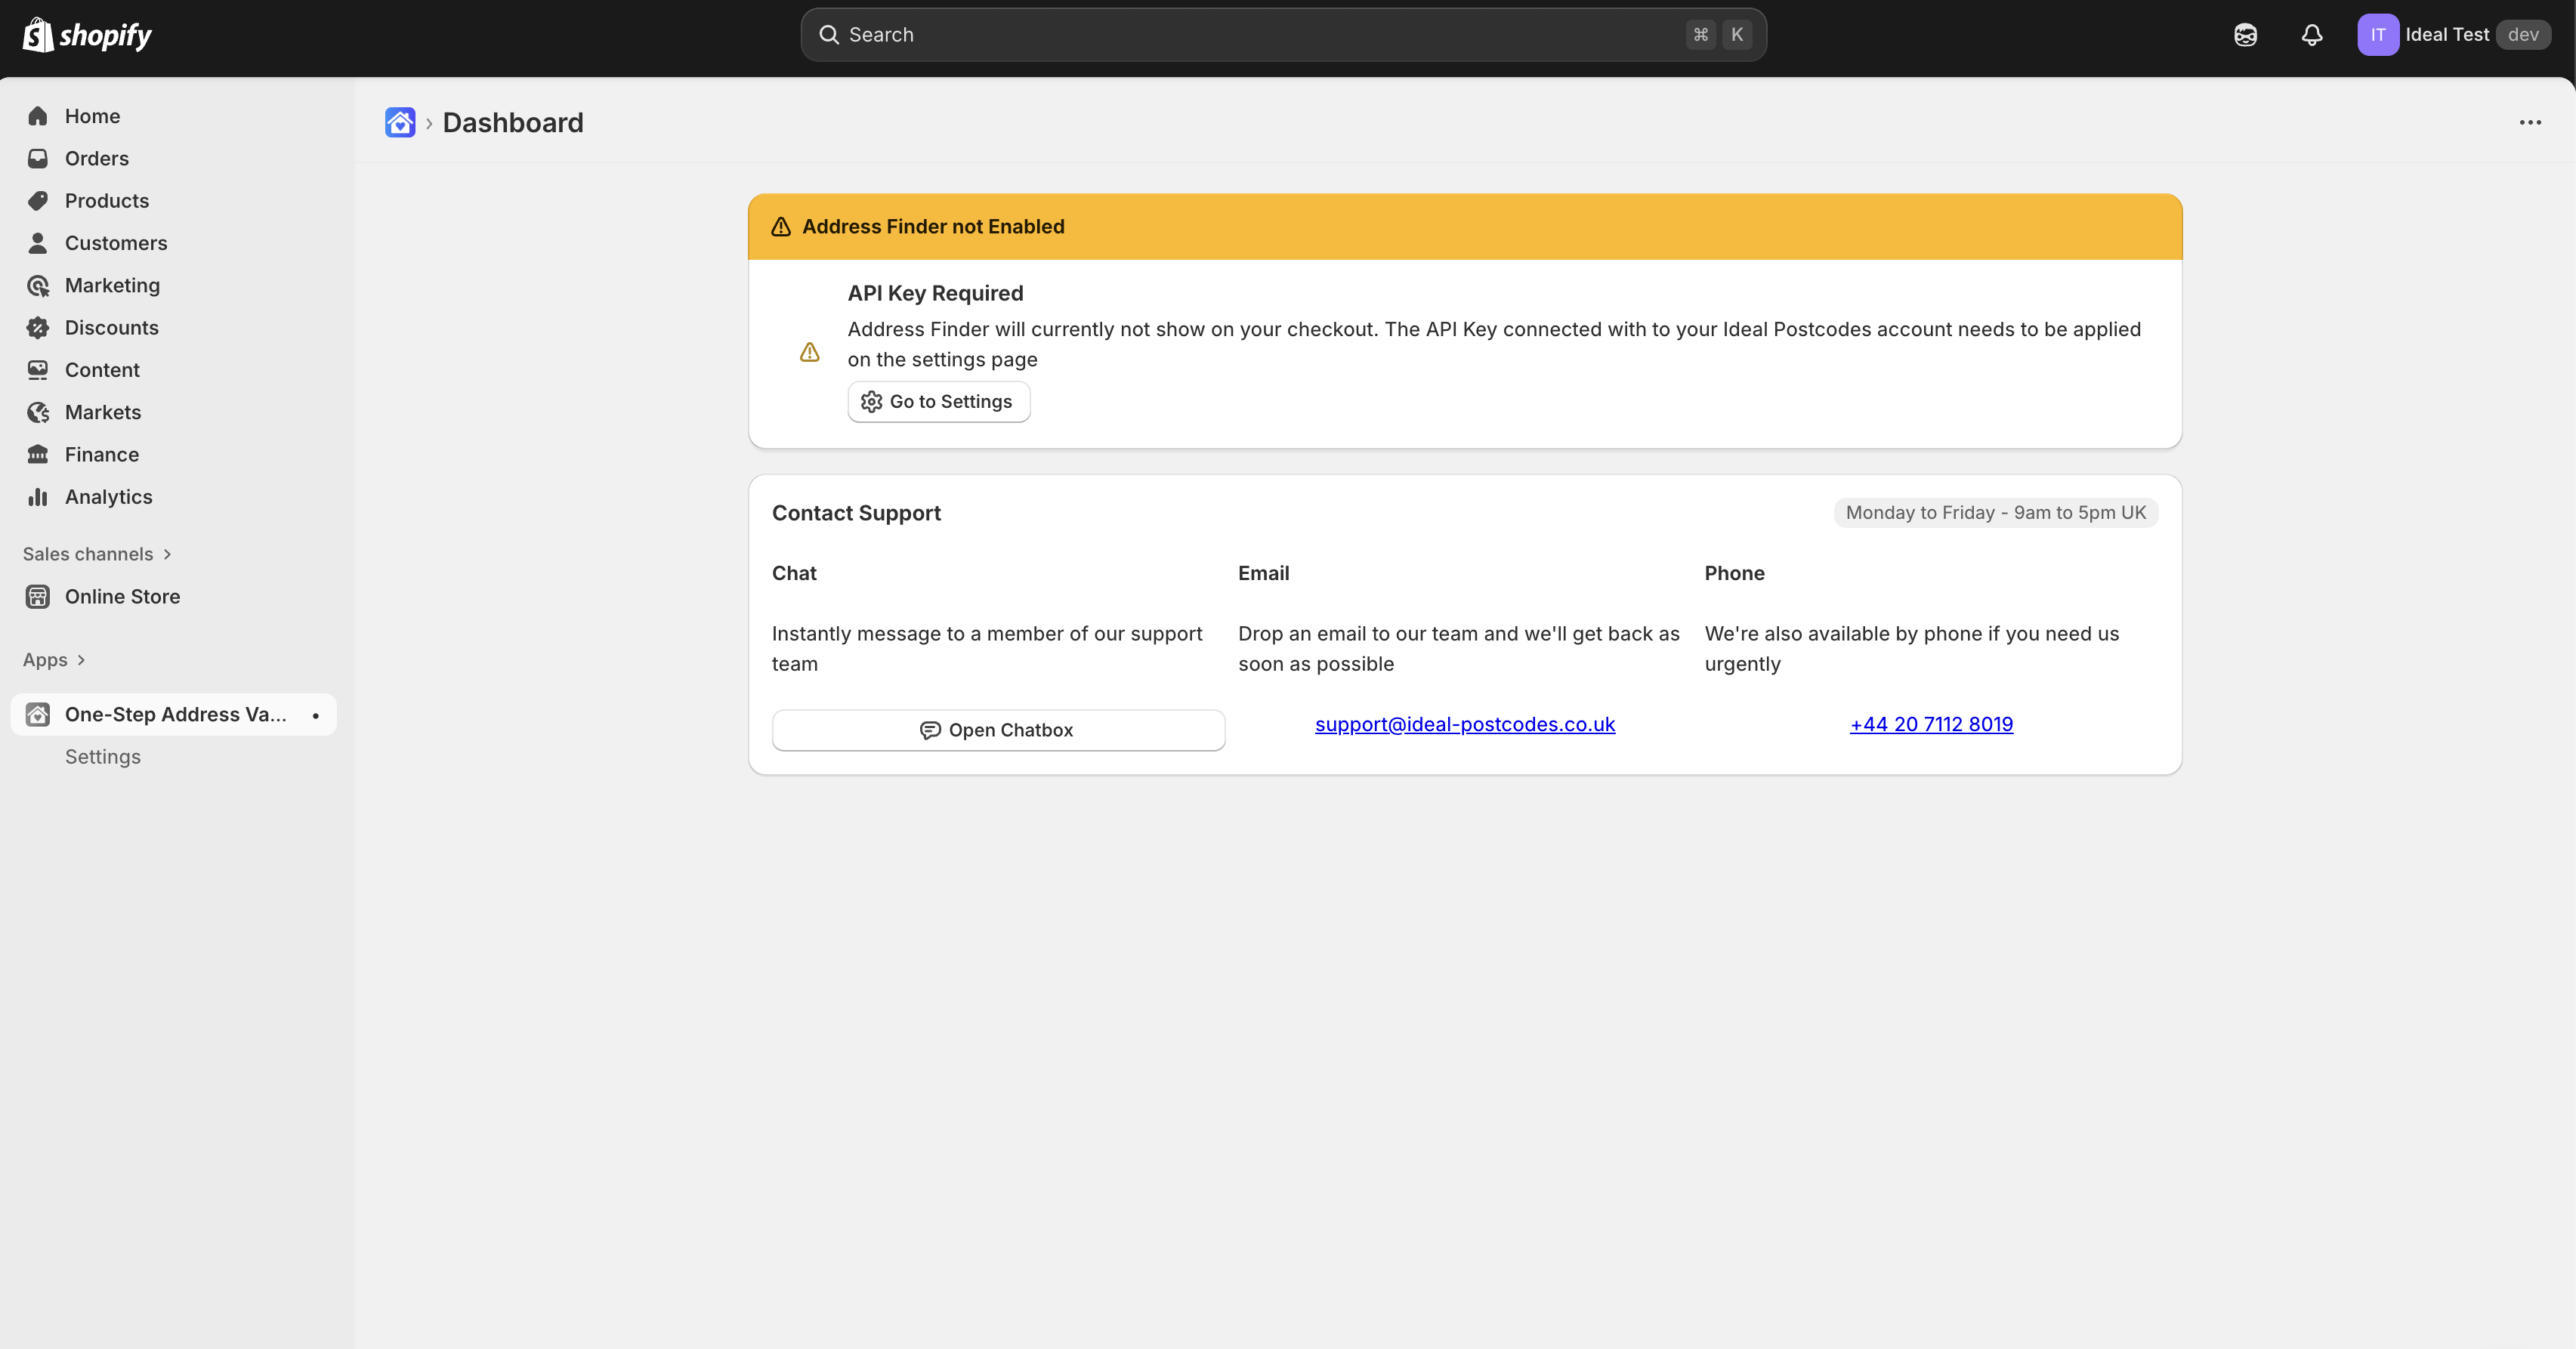
- Enter API Key: Paste your API Key from Step 1 into the API Key input field
- Save Configuration: Changes are automatically saved
Note: The app automatically checks your API key and displays an error if it’s invalid.
Key Management Tips:
- Give your key a descriptive name in your Ideal Postcodes account (e.g., "Shopify Production")
- Use different keys for testing and production environments
- Monitor usage in your Ideal Postcodes dashboard
API Key Security:
For production environments, configure additional security settings in your Ideal Postcodes account:
- URL Restrictions: Limit key usage to your Shopify store domain (e.g.,
yourstore.myshopify.com) - Daily Lookup Limits: Set maximum daily lookups to prevent unexpected charges
- Usage Monitoring: Enable alerts for unusual activity or approaching limits
- IP Whitelisting: Restrict usage to Shopify's IP ranges (optional, for advanced security)
To configure these settings, visit your API Key Settings page and click on your key to access security options.
4. Enable Address Autocompletion
The app powers Shopify's native address autocompletion - suggestions appear directly in Shopify's own address fields as the customer types, with no separate search box. Select the app as your store's autocompletion provider:
Steps:
- Open Checkout Settings: In the Shopify admin, go to Settings → Checkout
- Scroll to Address Autocompletion: Find the Address autocompletion section and ensure it is enabled
- Select the App as Provider: Choose One-Step Address Validation as the autocompletion provider
- Save Changes: Click Save to apply the changes
Important Notes:
- Selecting the app replaces Shopify's default (Google) autocomplete - customers see a single, consistent source of suggestions
- Until the app is selected here, address suggestions are not powered by Ideal Postcodes - this step is what switches autocomplete on
- Selected addresses pass through the app's standardisation and company-name transforms (see Advanced Settings)
5. Add the App Block to Checkout
The app block enables address filtering, the postcode lookup and the classic search box. It is separate from address autocompletion (Step 4) - each works without the other.
Steps:
-
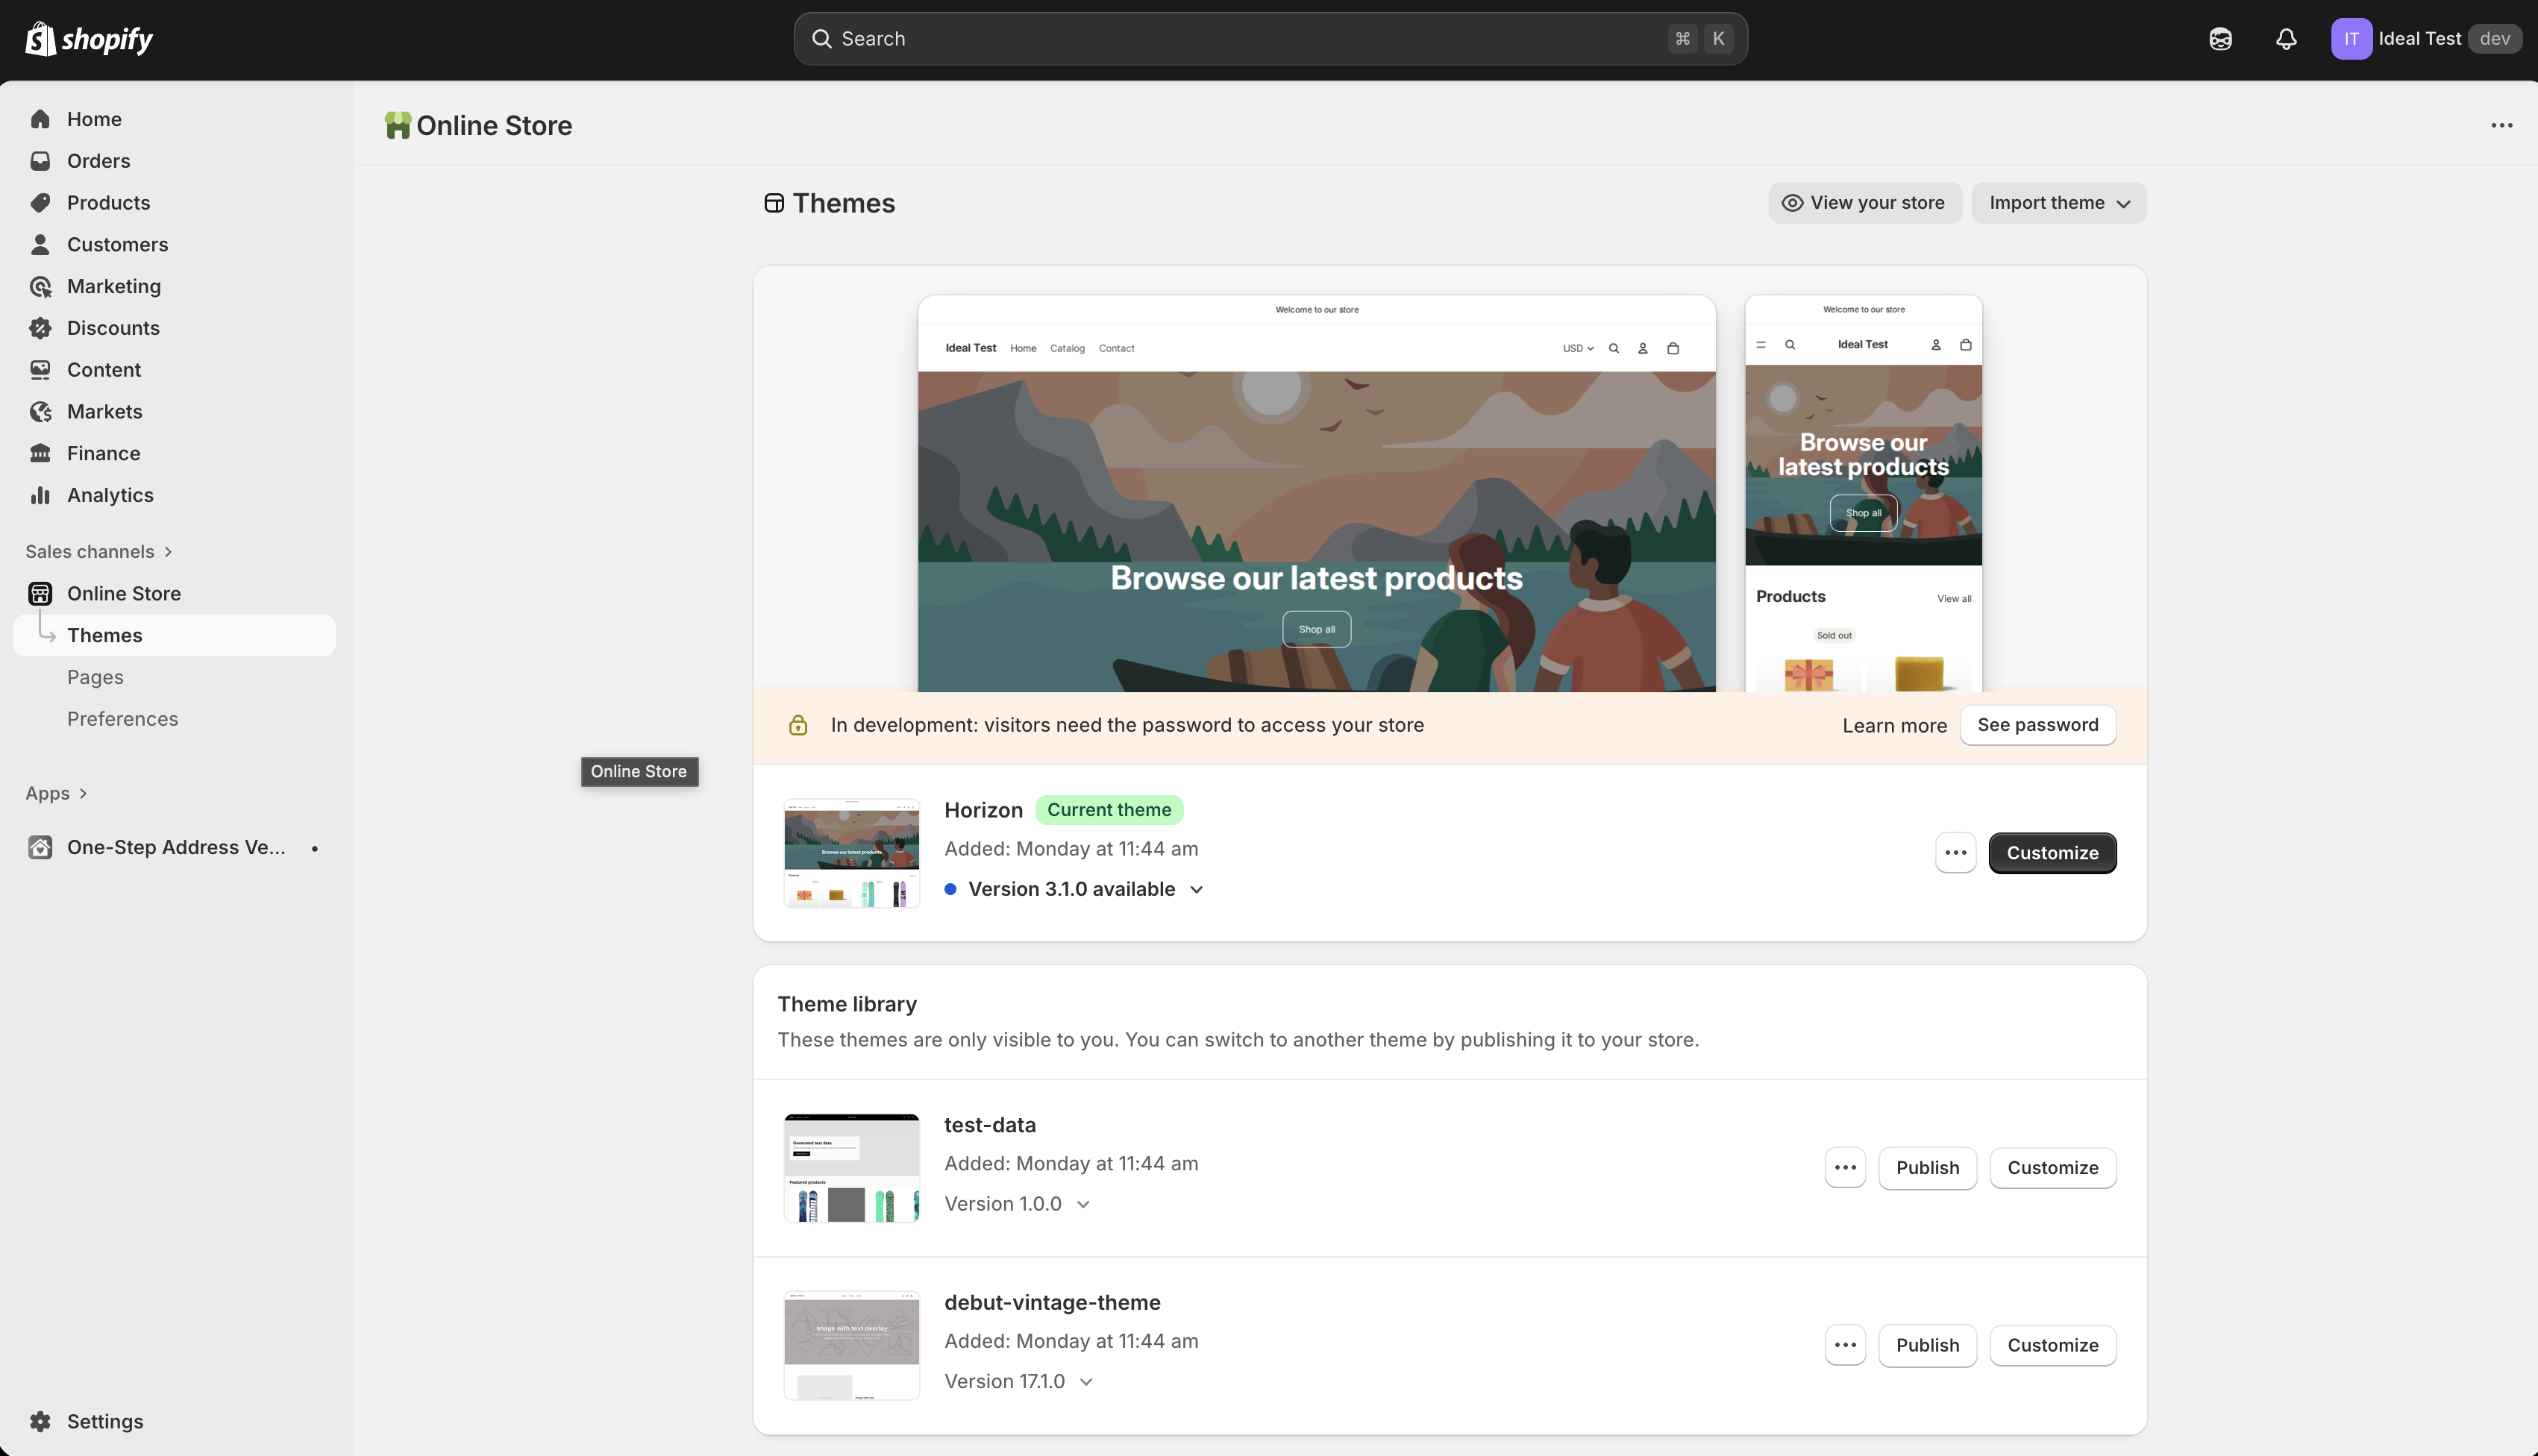
Open the Checkout Editor: In the Shopify admin, go to Settings → Checkout and click Customize on your live checkout profile
-
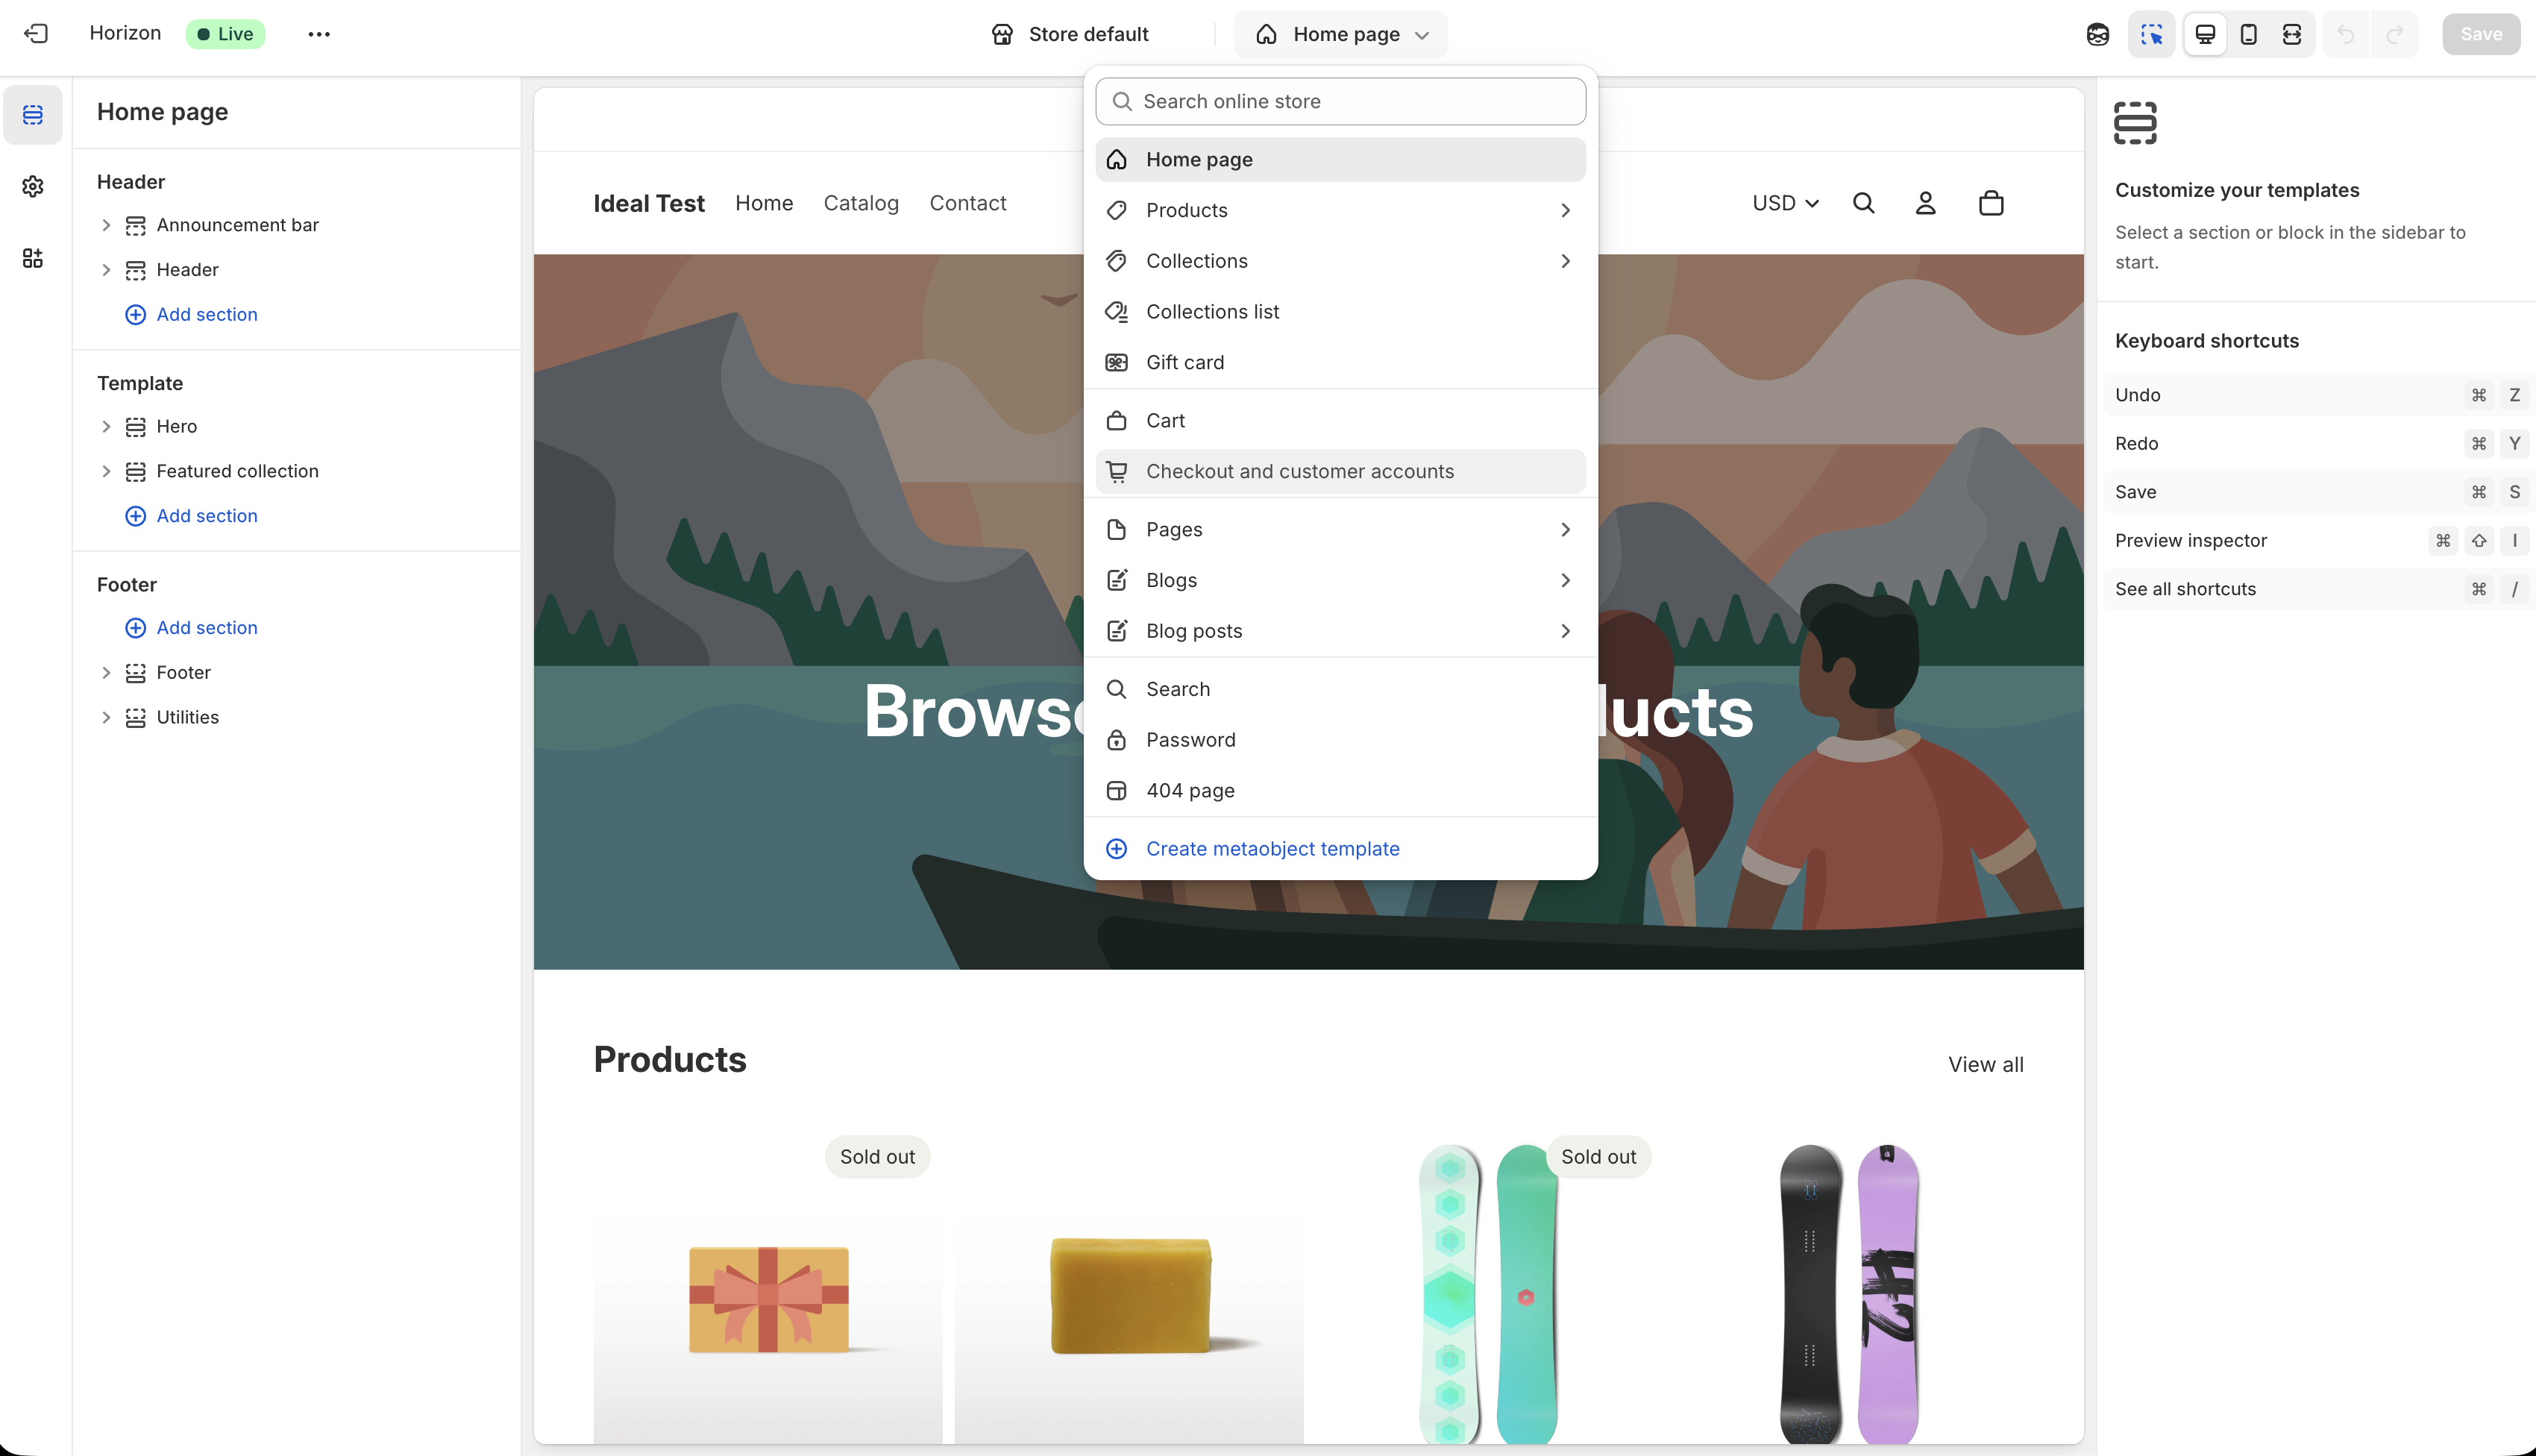
Navigate to Checkout: Ensure you are on the checkout information/shipping step
-
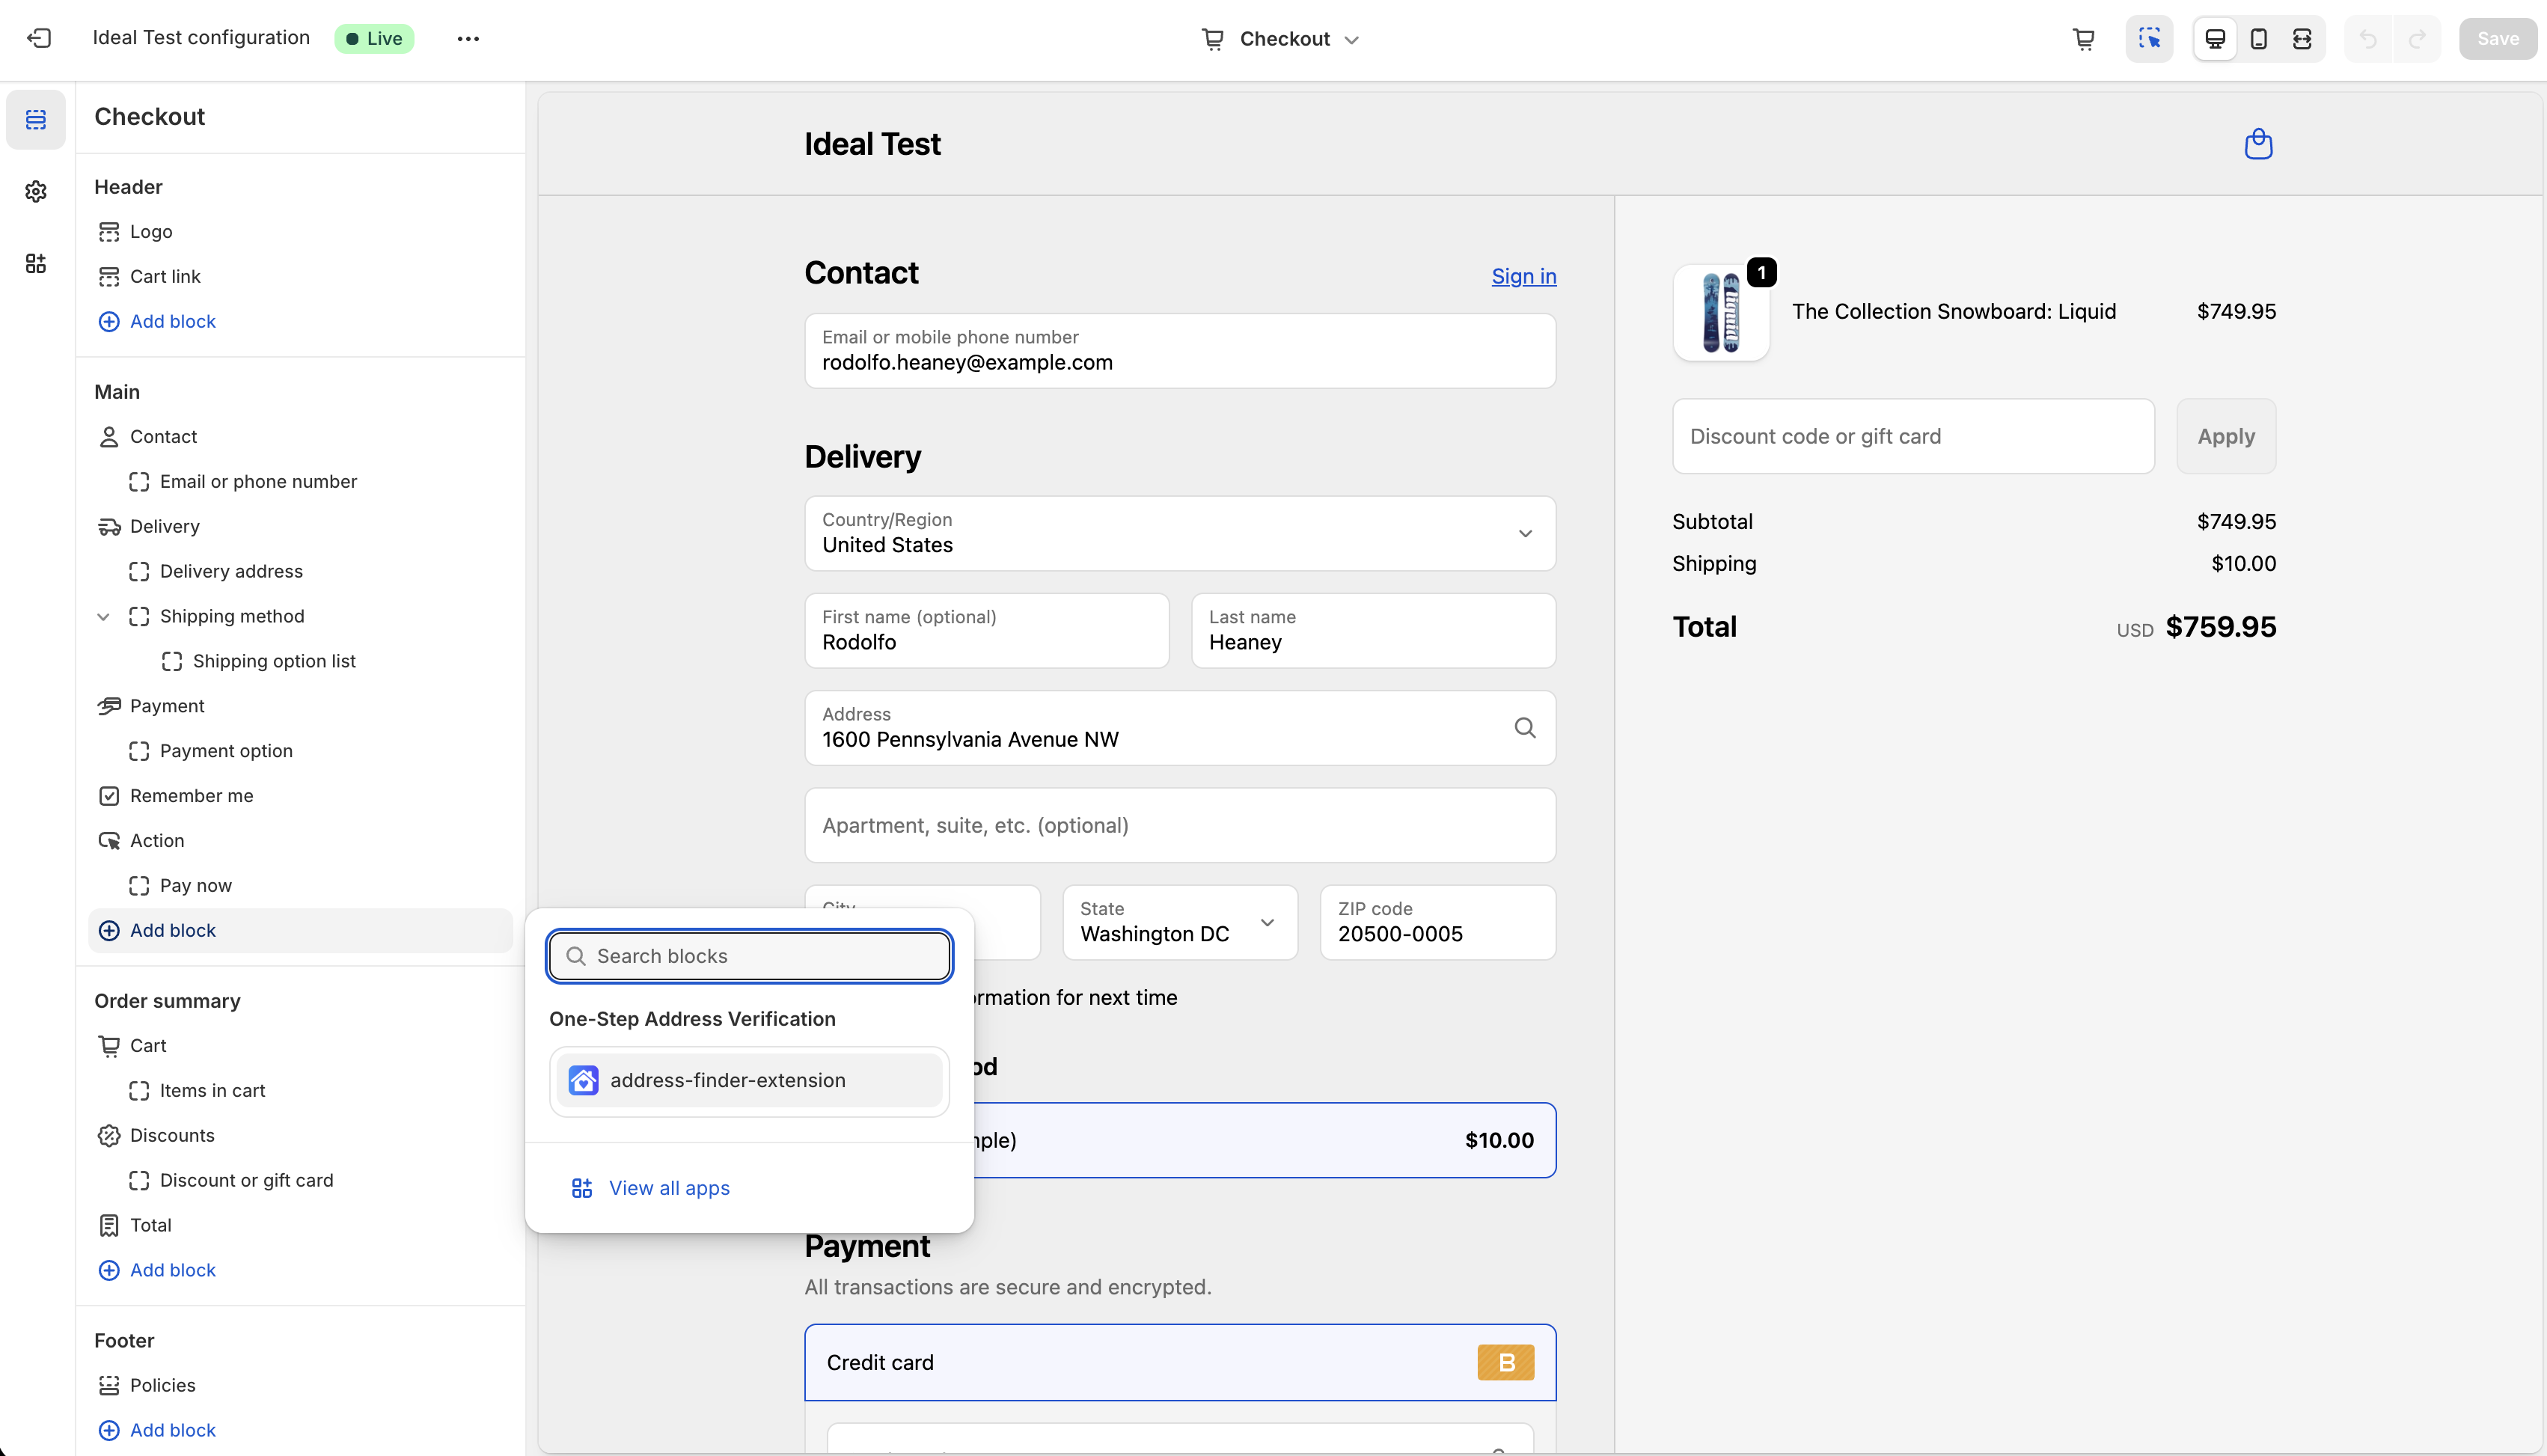
Add App Block: In the sidebar, click Add app block
-
Select Address Finder: Search for "Address Finder" and select the address-finder-extension app block
-
Allow Checkout Blocking (required for address filtering): Select the newly added app block and, in its settings panel, enable the permission that allows the app to block checkout progress. Without this permission, all of the address filtering rules in Advanced Settings (PO Boxes, military addresses, etc.) are silently ignored - Shopify only lets an app hold up checkout once the merchant has explicitly allowed it
-
Save Changes: Click Save in the top-right corner to publish your changes
Important Notes:
- The app block renders in a fixed position immediately before the delivery address form - it cannot be repositioned
- Address filtering runs invisibly; the postcode lookup and classic search box only render if enabled in the app's settings
- No additional code or configuration required
- Styling automatically matches your checkout branding
6. Test the Integration
Testing Steps:
- Access Checkout: Add a product to your cart and proceed to checkout
- Test Address Entry: Start typing an address in Shopify's address field
- Verify Suggestions: Address suggestions should appear beneath the field as you type
- Select Address: Click on a suggestion to auto-fill address line, city and postcode
- Complete Checkout: Verify that the checkout process completes successfully
Expected Behaviour:
- Address Suggestions: Appear as you type in Shopify's own address field - there is no separate search box
- Auto-Fill: Address fields populate automatically when a suggestion is selected, with any standardisation and company-name settings applied
- Error Handling: If the API is unavailable or the key is out of credit, suggestions simply stop appearing - customers can always type their address manually
Testing Postcode Lookup (if enabled):
- Set Country: Choose the United Kingdom, Ireland, Singapore or the Netherlands as the shipping country
- Enter Postcode: Type a postcode into the postcode search above the address form and click Find address
- Select Address: Pick an address from the dropdown and verify the address fields populate
7. Configure Advanced Settings
Postcode Lookup
Show a postcode search above the delivery address form. Customers enter their postcode, click Find address, and pick their address from a dropdown to fill the address form in one step.
| Setting | Type | Default | Description |
|---|---|---|---|
| Enable Postcode Lookup | Boolean | Off | Shows the postcode search on checkout for the United Kingdom, Ireland, Singapore and the Netherlands |
Notes:
- The lookup only appears when the shipping country is one of the supported countries; for all other destinations it stays hidden
- The search field label adapts to the destination: Postcode (United Kingdom, Netherlands), Eircode (Ireland), Postal code (Singapore)
- Requires the app block on checkout (see Add the App Block to Checkout) and a valid API key
- Postcode lookup works independently of address autocomplete - customers can use either
Address Filtering Options
The following settings allow you to prevent certain types of addresses from being submitted:
Address filtering only takes effect if the app has been allowed to block checkout progress in the checkout editor (see Add the App Block to Checkout, step 5). If that permission is off, these settings have no effect.
| Setting | Type | Default | Description |
|---|---|---|---|
| Block PO Boxes | Boolean | Off | Prevents customers from submitting PO Box addresses |
| Block Military Addresses | Boolean | Off | Prevents US and UK military addresses |
| Block non-contiguous US states (US Only) | Boolean | Off | Prevents addresses from Alaska, Hawaii, Puerto Rico, Guam, American Samoa, Northern Mariana Islands, US Virgin Islands |
| Block Highway Contract Routes (US Only) | Boolean | Off | Prevents US rural route addresses |
| Block Private Mailboxes (US Only) | Boolean | Off | Prevents US private mailbox addresses |
Address Standardisation Options
Control how addresses are formatted and standardised:
| Setting | Type | Default | Description |
|---|---|---|---|
| Limit Address Line One Length | Boolean | Off | Truncates first address line to maximum length |
| Avoid accented and special characters | Boolean | Off | Converts accented and special Latin characters to ASCII (é → e, ß → ss, ø → o) and removes emoji |
| Avoid special characters only | Boolean | Off | Keeps common accents but removes emoji and special characters |
Both options also normalise typographic punctuation (curly quotes, long dashes) to plain ASCII equivalents. Characters from non-Latin scripts (e.g. Chinese, Arabic, Cyrillic) are removed rather than converted, so these options are best left off for stores serving customers with non-Latin addresses.
Avoid accented and special characters is not recommended for European addresses as it may alter customer names and street names.
Company Name Handling
Control how company information is populated:
| Setting | Type | Default | Description |
|---|---|---|---|
| Remove Company Name from Address | Boolean | Off | Removes company name from address lines when present |
| Populate Company Name from Address | Boolean | Off | Auto-fills company field when company is in address |
Classic Search Box
Earlier versions of this app provided address search through a separate search box rendered above the delivery address form. This has been superseded by native address autocompletion (see Enable Address Autocompletion), but remains available as an option.
| Setting | Type | Default | Description |
|---|---|---|---|
| Enable classic search box | Boolean | Off | Shows the search box above the delivery address form at checkout |
Notes:
- Stores that installed the app before native autocompletion was introduced have this switched on, preserving their existing checkout experience
- New installations default to off - native autocompletion is the recommended setup
- If you enable native autocompletion, disable the classic search box to avoid presenting customers with two address search inputs
- Requires the app block on checkout (see Add the App Block to Checkout)
8. Troubleshooting
Common Issues & Solutions
❌ No Address Suggestions Appear
Symptoms: Address fields don't show suggestions when typing
Solutions:
- Check Autocompletion Provider: In Settings → Checkout, confirm Address autocompletion is enabled and this app is selected as the provider
- Check API Key: Make sure the key in app settings is correct
- Review Balance: Confirm you have credits on your key
- Verify App Status: Ensure app is installed and active in Shopify admin
❌ Postcode Lookup Not Appearing
Symptoms: The postcode search box does not show above the delivery address form
Solutions:
- Check Setting: Confirm Enable Postcode Lookup is switched on in the app's settings page
- Check Country: The lookup only appears for the United Kingdom, Ireland, Singapore and the Netherlands - verify the shipping country selected at checkout
- Check API Key: Make sure the key is correct and has credits remaining
- Check App Block: Make sure the app block is added to your live checkout profile
❌ Address Blocking Rules Not Working
Symptoms: Blocked address types (PO Boxes, military addresses, etc.) can still complete checkout despite the settings being enabled
Solutions:
- Check Blocking Permission: In the checkout editor (Settings → Checkout → Customize), select the Address Finder app block and confirm it is allowed to block checkout progress
- Check App Block: Confirm the app block is added to the checkout and the change was saved to your live checkout profile
- Verify Settings: Confirm the relevant blocking toggles are enabled in the app's settings page
❌ App Not Installing
Symptoms: Cannot install app or installation fails
Solutions:
- Check Shopify Plan: Verify you have Shopify Plus (required for this app)
- Check Permissions: Ensure you have admin access to install apps
- Browser Issues: Try a different browser or clear cache
- Contact Shopify: Reach out to Shopify support if installation continues to fail
❌ Address Fields Not Populating
Symptoms: Address suggestions appear but don't fill form fields correctly
Solutions:
- Check Standardisation Settings: Aggressive standardisation options can alter or strip characters from the selected address - review the Address Standardisation Options
- Clear Cache: Clear both Shopify and browser cache
- Check Custom Checkout: If using custom checkout code, verify field names match standard Shopify fields
General Troubleshooting Steps
Before Contacting Support:
-
Verify API Key Configuration
- Ensure API key is correctly entered (format:
ak_xxxxxxxxxx) - Check key is active in your Ideal Postcodes account
- Verify sufficient lookups remaining in your account
- Ensure API key is correctly entered (format:
-
Check App Status
- Confirm app is installed and active in Shopify admin
- Confirm the app is selected under Settings → Checkout → Address autocompletion
- Verify the app block is added to your live checkout profile in the checkout editor
- Check that app has necessary permissions
-
Test in Clean Environment
- Test in private/incognito browser window
- Disable browser extensions that might interfere
- Test on different devices (desktop, mobile, tablet)
-
Debug JavaScript Issues
- Open browser developer console (F12)
- Look for error messages related to
ideal-postcodesoraddress - Check if scripts are blocked by content security policies
-
Theme Compatibility
- Verify theme is up to date
- Check if theme has custom checkout modifications
- Test with a default Shopify theme to isolate theme issues
Need help? Contact our support team via live chat on our website or email support@ideal-postcodes.co.uk.